ps繪制一個老式寶麗萊相機圖標
時間:2024-02-19 12:45作者:下載吧人氣:29
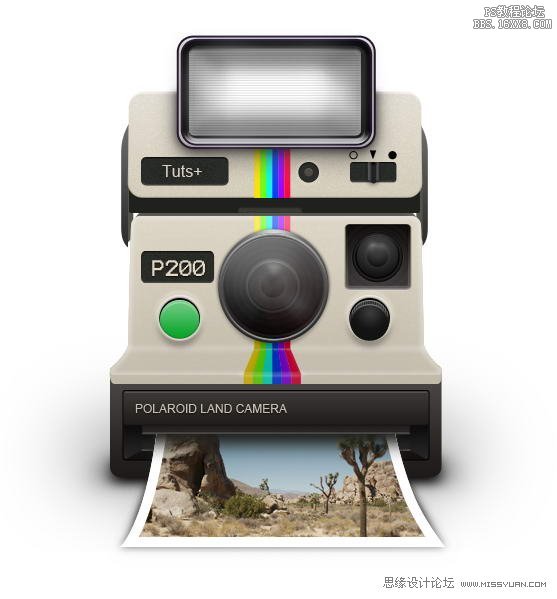
Inthis tutorial, we will create a Polaroid camera icon. We will use lots of layerstyles and draw manually with the brush tool to achieve a realistic appearance.Let’s get started!
在本教程中,我們將創(chuàng)建一個寶麗來相機圖標。我們將使用大量的圖層樣式和筆刷工具繪制手動實現(xiàn)逼真的外觀。讓我們開始吧!
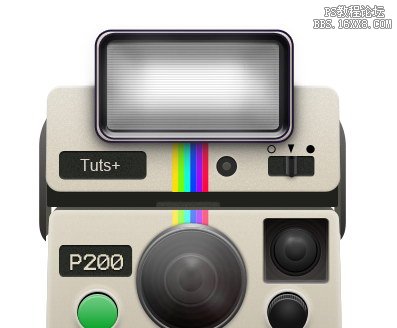
先看看效果圖
Step 1:Upper Body
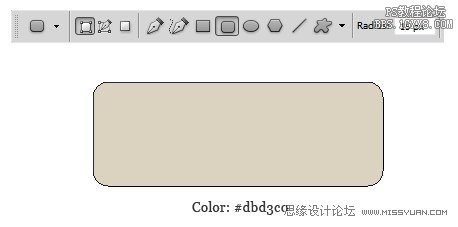
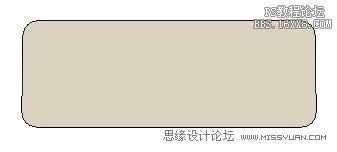
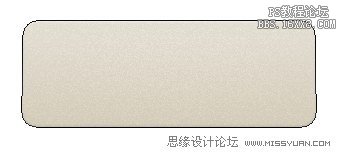
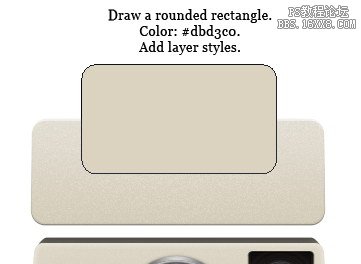
Createnew file, with size 600×700 px. Start by creating a rounded rectangle withcolor: #dbd3co.
創(chuàng)建新的文件,大小為600× 700像素。首先,創(chuàng)建一個圓角矩形的顏色:#dbd3co。
Step2
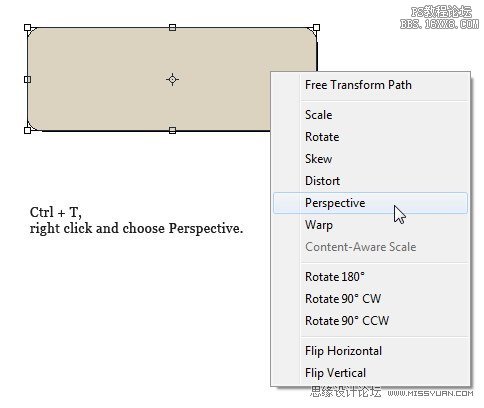
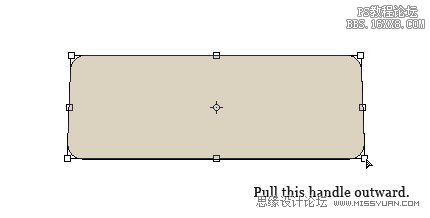
Hit Command/Ctrl + T to perform transformation. Right click and choose Perspective. Pull lower corner outward.
點擊命令/按Ctrl + T進行改造。右擊并選擇視角。下角向外拉。
Step 3
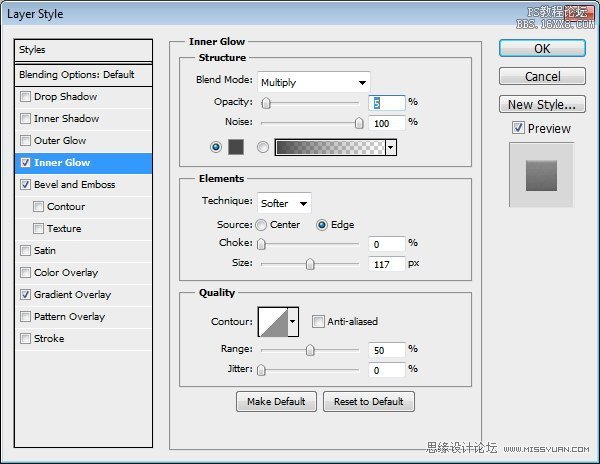
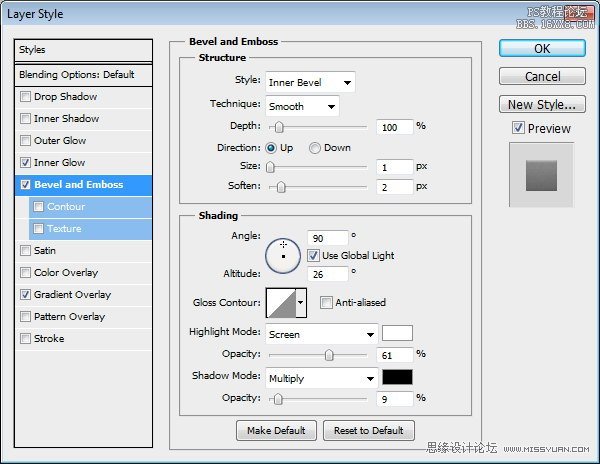
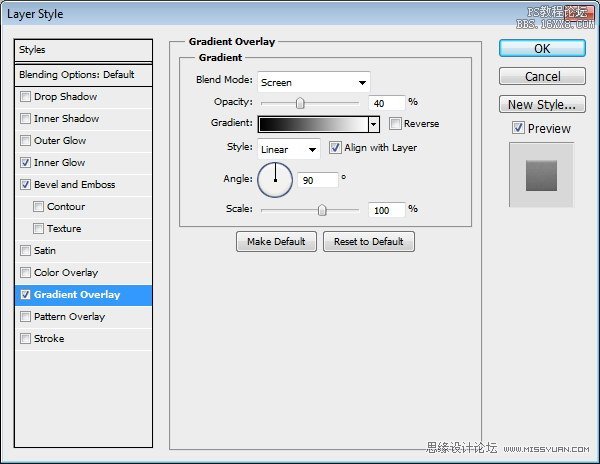
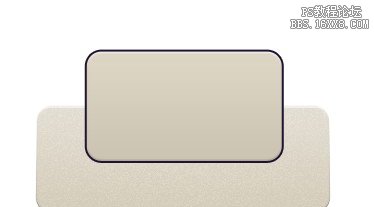
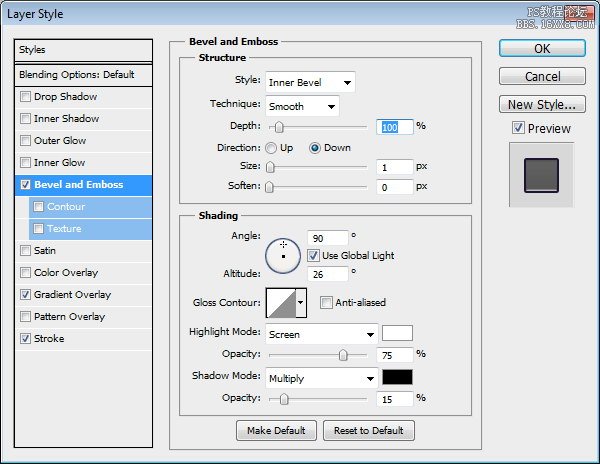
Addfollowing layer styles.
新增以下圖層樣式。
Step 4
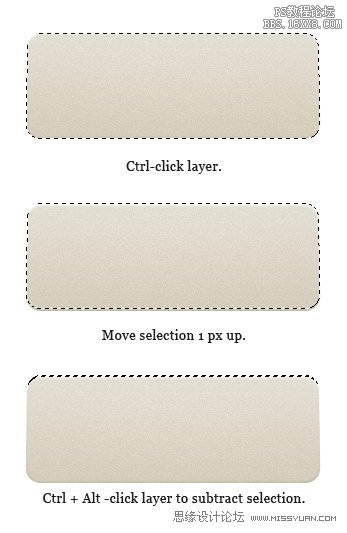
Command/Ctrl-clicklayer to get a selection based on its shape. Nudge selection 1 px up bypressing up arrow. Hold Command/Ctrl + Alt then click layer again to subtractthe selection. This process will give you a 1 px selection on top of the shape.
命令/
Ctrl鍵點擊層以獲得其形狀為基礎(chǔ)的選擇。微調(diào)選擇1像素注冊按向上箭頭。按住Command/按Ctrl + Alt然后再減去按層選擇。這個過程會給你一個形狀的前1像素的選擇。
Step 5
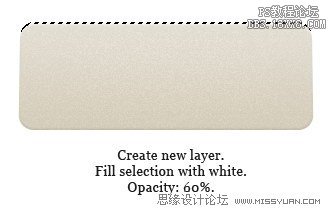
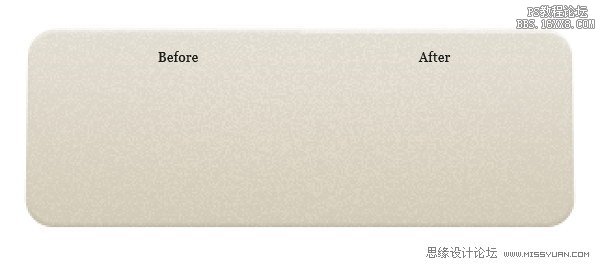
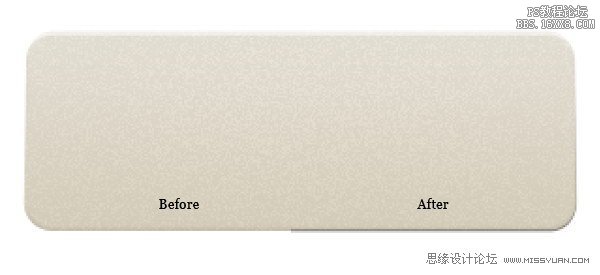
Createnew layer and fill selection with white. Reduce layer opacity to 60%. Below,you can see the subtle difference before and after adding a 1 px line.
創(chuàng)建新圖層,用白色填充選擇。降低圖層不透明度為60%。下面,你可以看到之前和之后添加1像素線的細微差別。
Step 6
Repeatprevious step, this time for bottom of the shape. Fill selection with black.
重復(fù)上一步,這對于底部時的形狀。選擇填充黑色。

Step 7:Middle Body
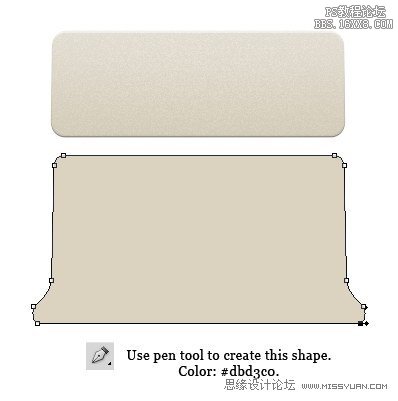
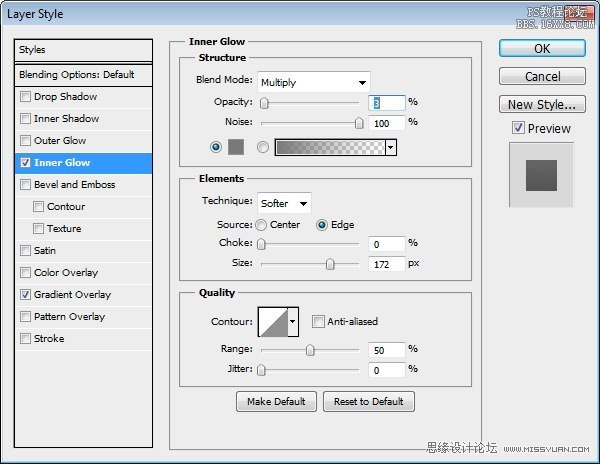
Use pentool to create this shape. Use #dbd3co for its color. Add Layer Style InnerGlow and Gradient Overlay.
使用鋼筆工具創(chuàng)建此形狀。它的顏色使用#dbd3co。添加圖層樣式內(nèi)發(fā)光和漸變疊加。

step 8
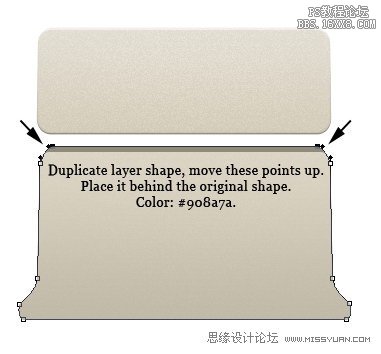
Duplicatethe shape we have just created. Place it behind the original. Use arrow tool tomove the topmost points up. Change shape color to #908a7a.
重復(fù)的形狀,我們剛剛創(chuàng)建的。原來它放在后面。使用箭頭工具移動最上面的點組成。改變形狀,顏色為#908a7a。
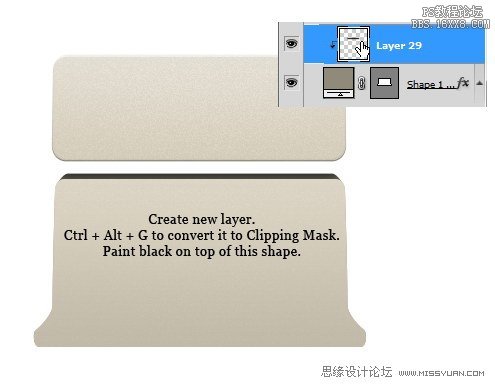
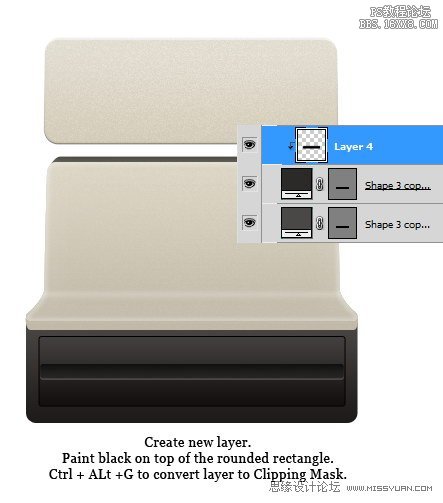
Step 9
Theshape is still too light. We need to darken it again to add more depth. Createnew layer. Convert layer to Clipping Mask by pressing Command/Ctrl + Alt + G.Paint black on top of the shape.
形狀仍然過輕。我們需要再次變暗增加更多的深度。創(chuàng)建新的圖層。轉(zhuǎn)換層的迫切剪貼蒙版命令/按Ctrl+ Alt+G。填充頂部形狀為黑色。
Step 10
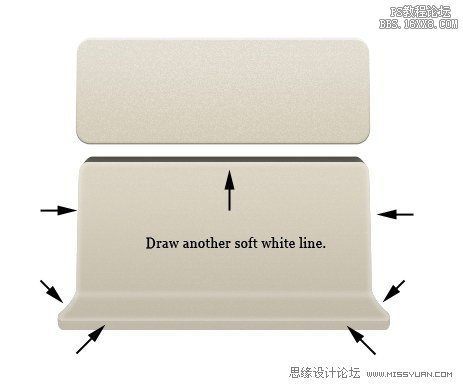
Createnew layer. Activate brush tool, in the Option Bar set brush hardness to 0%.Draw a soft white line.
創(chuàng)建新的圖層。激活筆刷工具,設(shè)置畫筆硬度為0%。畫出軟白線。

Step 11
Again, paintanother soft white lines on indicated areas.
同樣,填充另一個表示地區(qū)軟白線。
Step 12
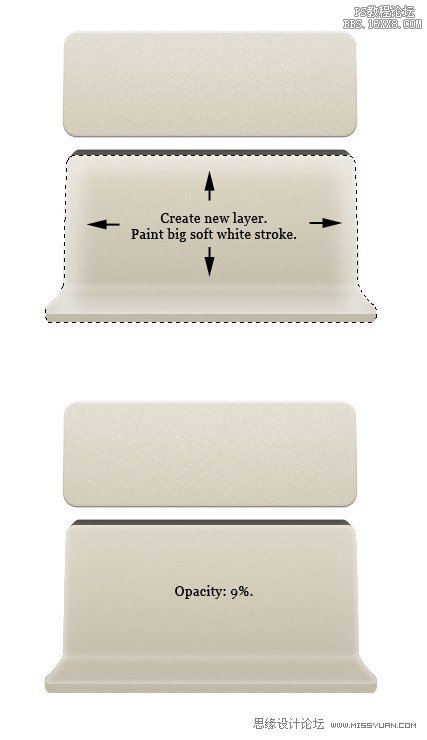
Createnew layer. Command/Ctrl-click shape. Use soft brush to paint white on eachedge. Reduce layer opacity to 9%.
創(chuàng)建新的圖層。命令/
Ctrl鍵單擊形狀。用軟刷子涂刷在每個邊緣白色。圖層不透明度降低到9%。
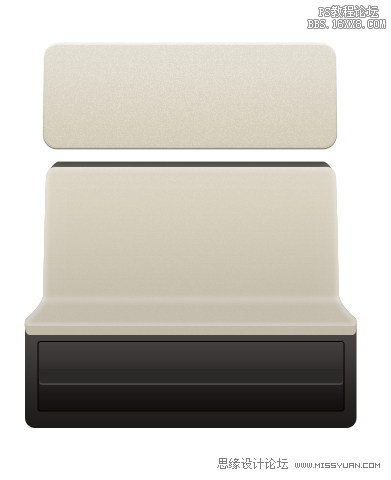
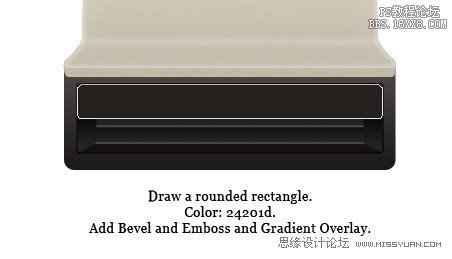
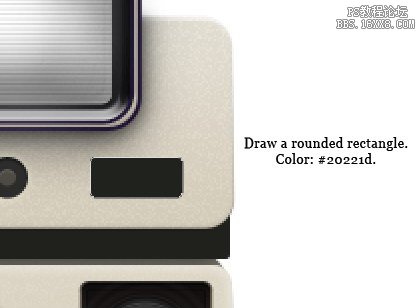
Step 13:Camera Face
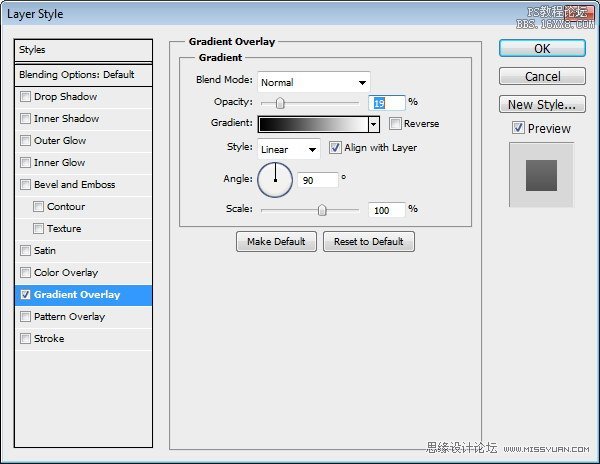
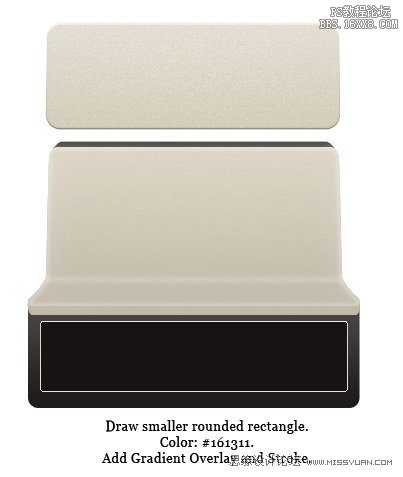
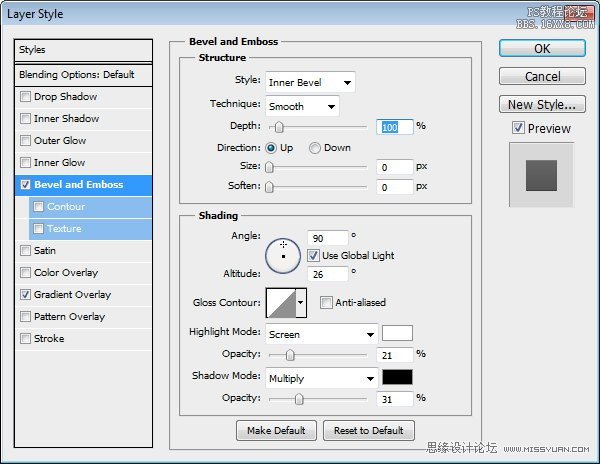
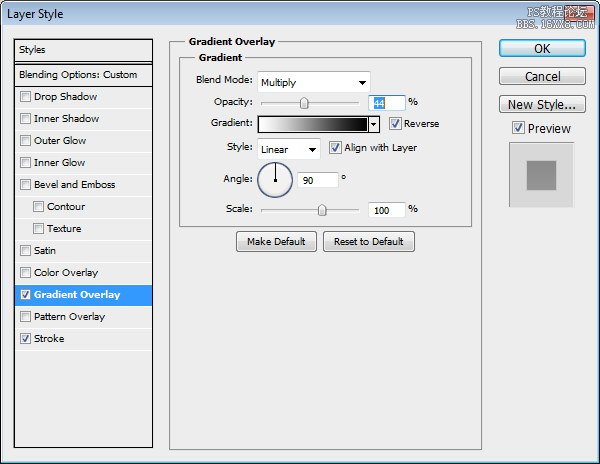
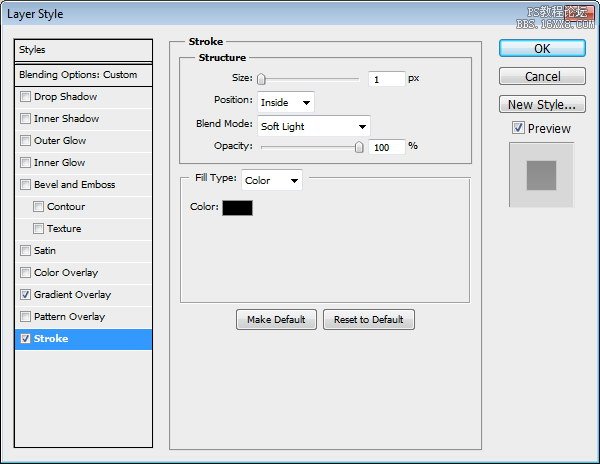
Draw arounded rectangle for front face of the camera. Use #24201d for its color. AddLayer Style Gradient Overlay.
畫出相機的前臉圓角矩形。它的顏色使用#24201d。添加漸變疊加圖層樣式。

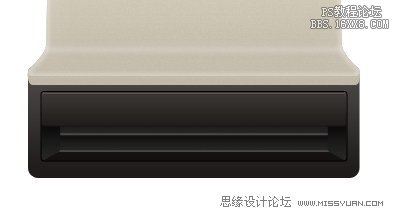
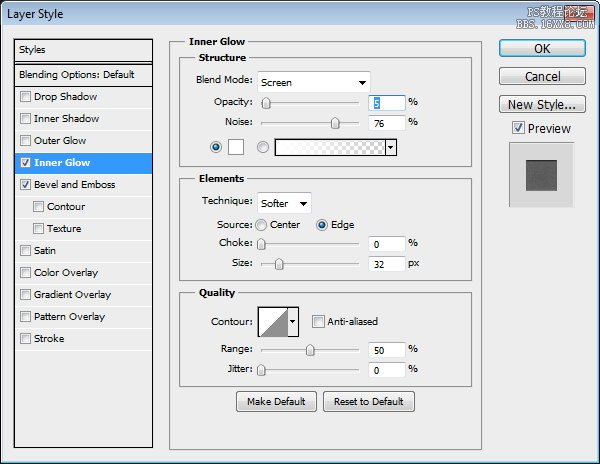
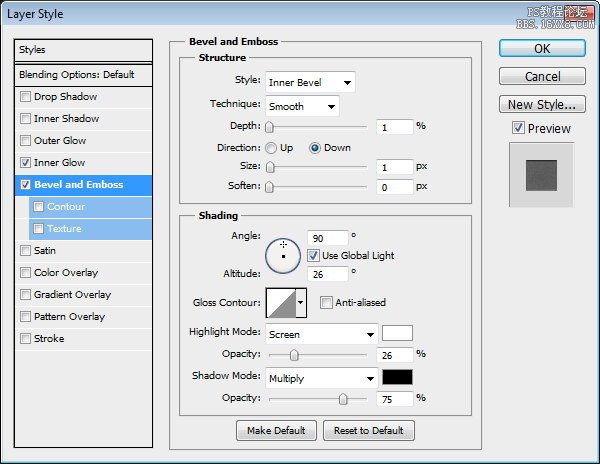
Step 14
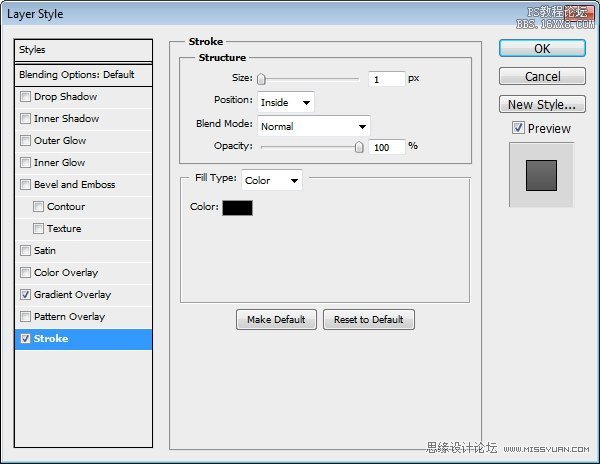
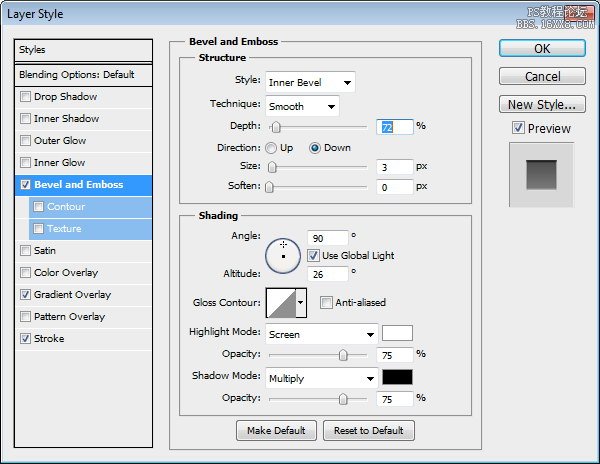
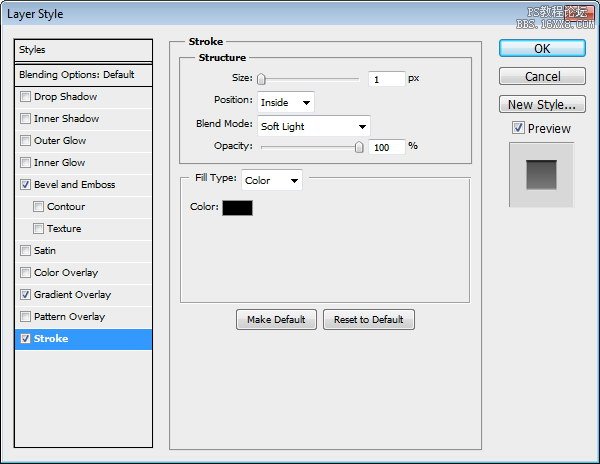
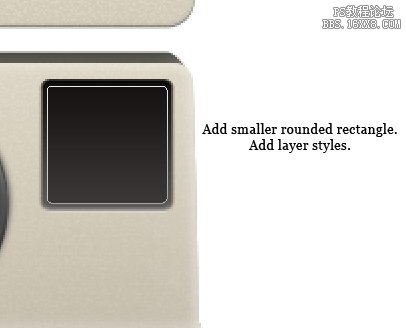
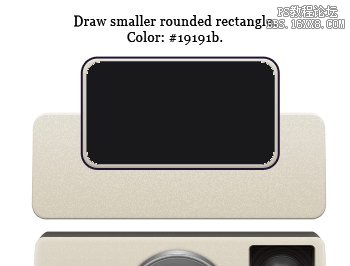
Insideprevious shape, draw smaller rounded rectangle with color #131611. Add followingLayer Styles.
在原來的形狀內(nèi),畫一個小圓角矩形顏色#131611。新增以下圖層樣式。

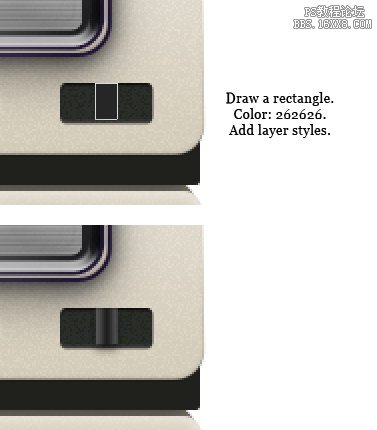
Step 15
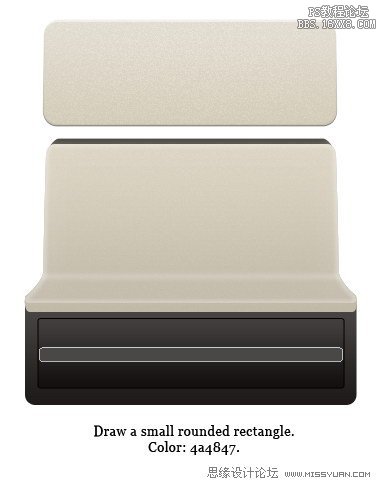
Add asmall rounded rectangle with color #4a4847 and place it in the middle of theprevious shape.
添加一個顏色#4a4847小圓角矩形,并放置在前面的形狀中間。
Step 16
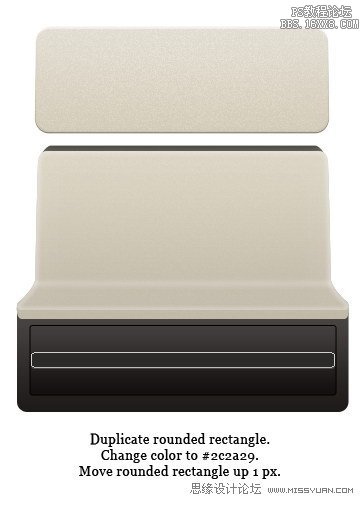
Duplicateshape, move it up 1 px. Change its color to #2c2a29.
重復(fù)的形狀,將其移動了1像素。改變其顏色為#2c2a29。
Step 17
Createa new layer and convert it to Clipping Mask by pressing Command/Ctrl + Alt + G.Draw shadow on top of the shape.
創(chuàng)建一個新層,并將其轉(zhuǎn)換按命令/按Ctrl + Alt+G。畫上陰影的形狀到剪貼蒙版。
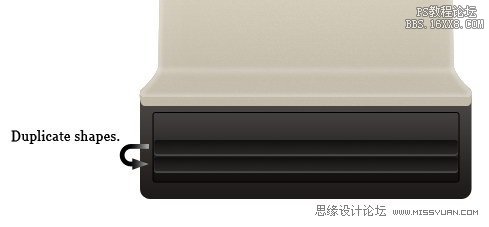
Step 18
Duplicatethe shapes by dragging it while holding the Alt key.
按住Alt鍵重復(fù)的拖動形狀。
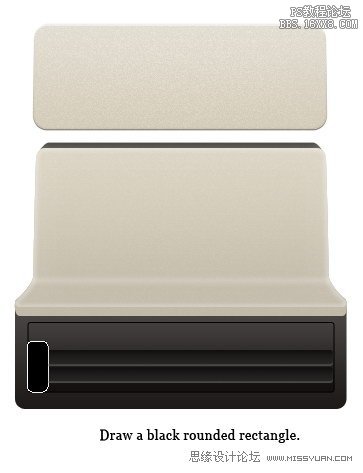
Step 19
Draw ablack rounded rectangle. See picture below to see its position.
繪制一個黑色的圓角矩形。見下面的圖片看到它的位置。
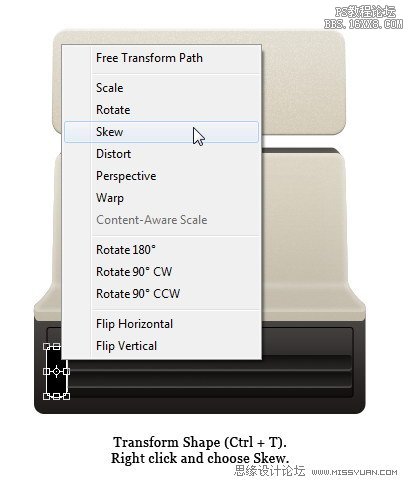
Step 20
HitCommand/Ctrl + T, right click and choose Skew.
點擊命令/按Ctrl + T,右擊并選擇偏差。
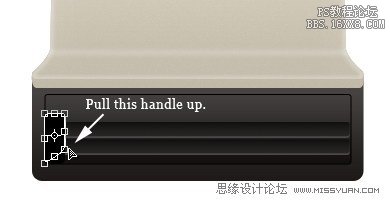
Step 21
Pulllower right corner up. Add Gradient Overlay.
拉右下角了。添加漸變疊加。


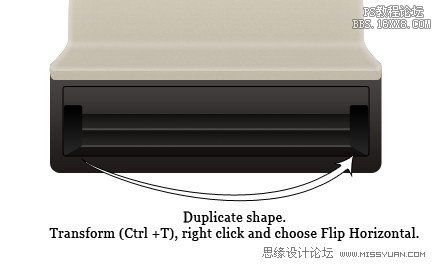
Step 22
Duplicateshape. Move it to the opposite side. Hit Command/Ctrl + T to performtransformation. Right click and choose Flip Horizontal.
重復(fù)的形狀。將它移動到另一側(cè)。點擊命令/按Ctrl+ T進行改造。右鍵單擊并選擇水平翻轉(zhuǎn)。
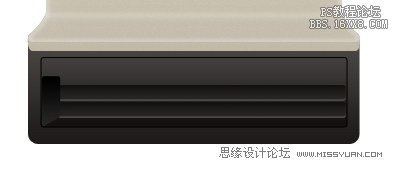
Step 23
Draw a roundedcovering both shapes we have just created. Add Layer Styles.
繪制一個圓形覆蓋我們剛才創(chuàng)建的形狀。添加圖層樣式。

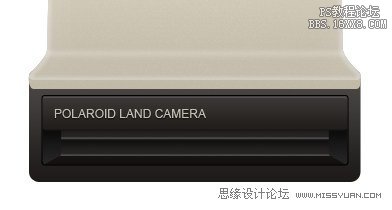
Step 24
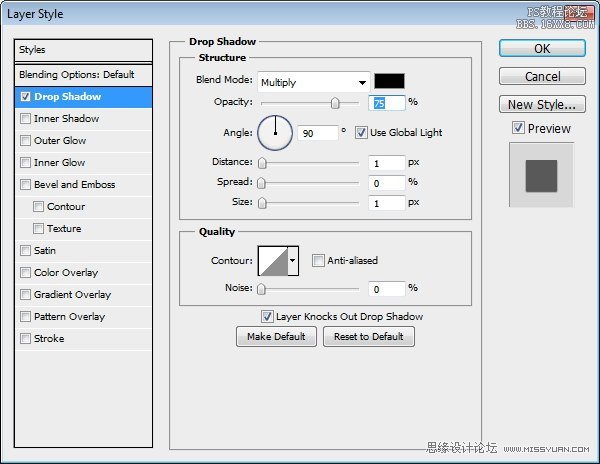
Usetype tool to add camera name. Add a subtle Drop Shadow to give itthree-dimensional appearance.
使用文字工具添加攝像頭的名稱。添加一個微妙的陰影,給它的三維外觀。
Step 25
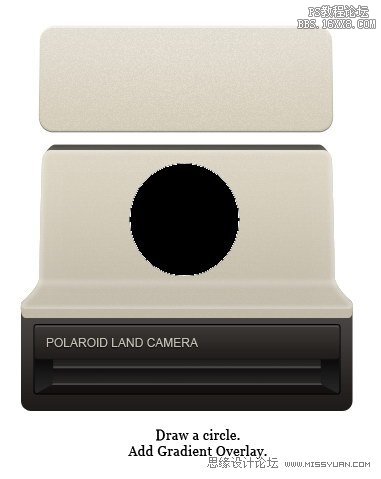
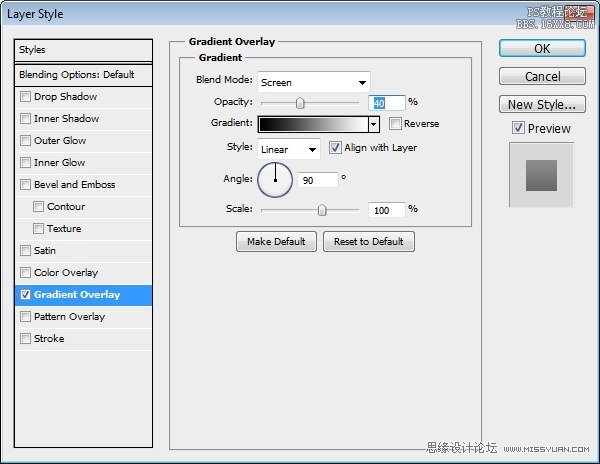
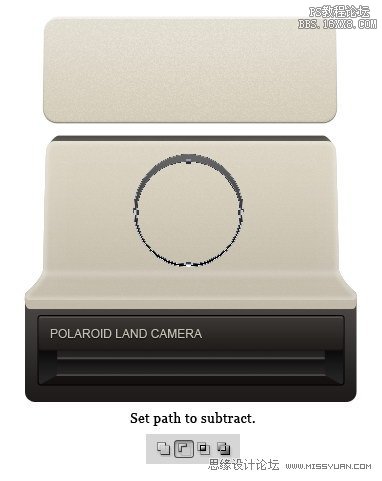
Draw acircle to be used as a camera lens. Add Gradient Overlay.
畫一個圓圈,作為鏡頭使用。添加漸變疊加。
Step26
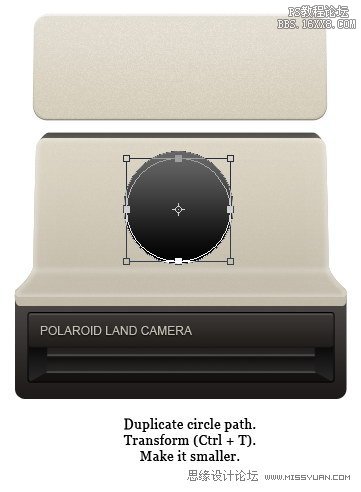
Selectcircle path. Hit Command/Ctrl + C then Command/Ctrl + V to duplicate it.Perform transformation (Command/Ctrl + T) and make it smaller. See picturebelow to reference.
選擇圓路徑。點擊命令/按Ctrl+
C,然后命令/
Ctrl + V鍵復(fù)制它。執(zhí)行轉(zhuǎn)換(命令/按Ctrl+ T),使之更小。見下面的圖片參考。
Step 27
Fromthe option bar, set path mode to subtract.
從選項欄,設(shè)定的路徑模式為subtract。
Step 28
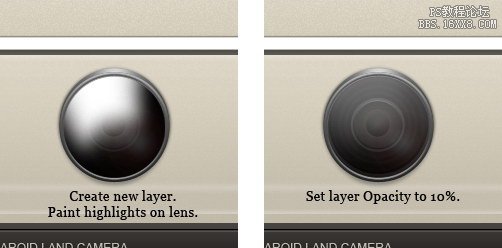
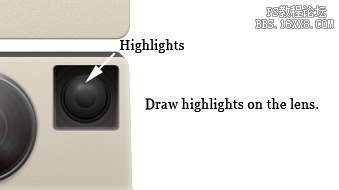
Createnew layer then convert it to Clipping Mask by pressing Command/Ctrl + Alt + G.Draw highlight on top of the lens.
創(chuàng)建新層,然后將其轉(zhuǎn)換為剪貼蒙按命令/按Ctrl+ Alt+G借鑒鏡頭前的亮點。
Step 29
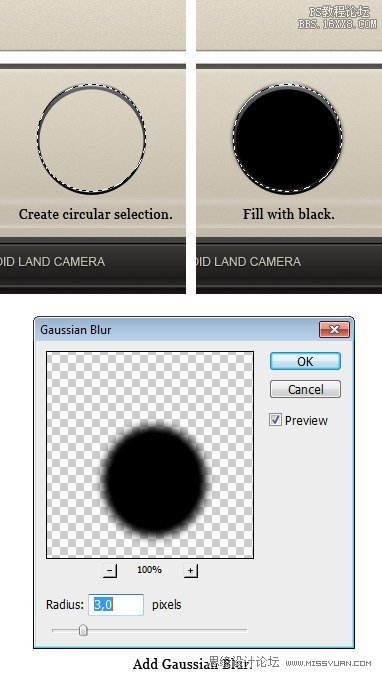
Createnew layer and put it behind shape we have just created. Create circularselection and fill it with black. Soften it by adding Gaussian Blur (Filter> Blur > Gaussian Blur).
創(chuàng)建新層,并把它的背后,我們剛剛創(chuàng)建的形狀。創(chuàng)建圓形選區(qū),并填充黑色。軟化,加入高斯模糊(濾鏡“模糊”高斯模糊)。
Step 30
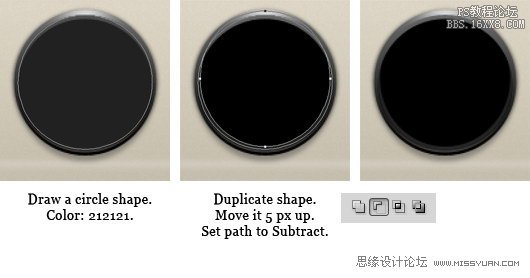
Draw acircle shape with color #212121. Duplicate shape then move it 5 px up. Set pathmode to Subtract.
繪制一個圓形顏色#212121。重復(fù)的形狀,然后將其移動5像素了。設(shè)置路徑模式為減。
Step 31
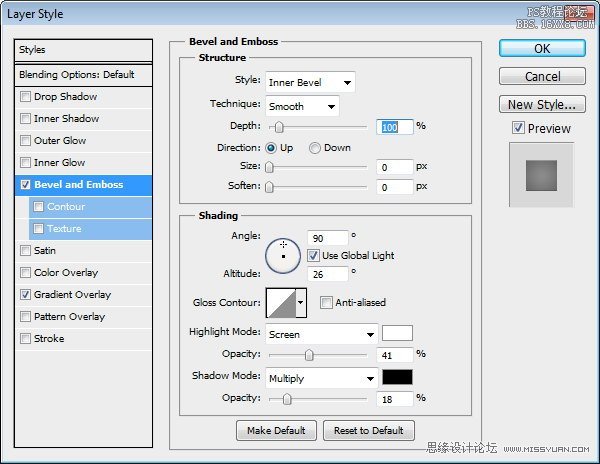
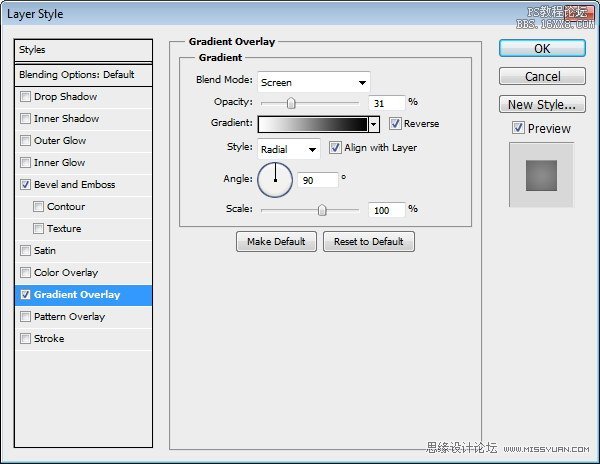
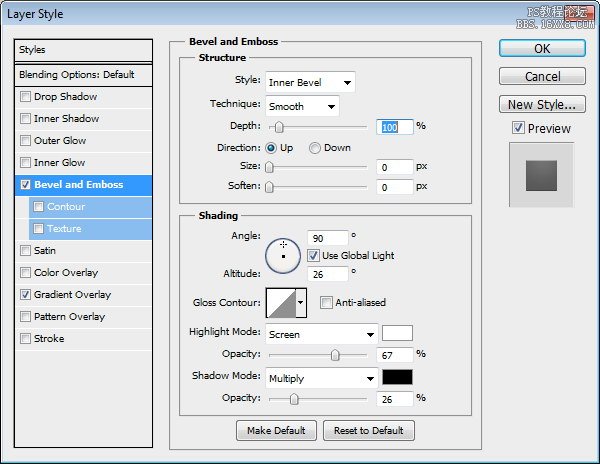
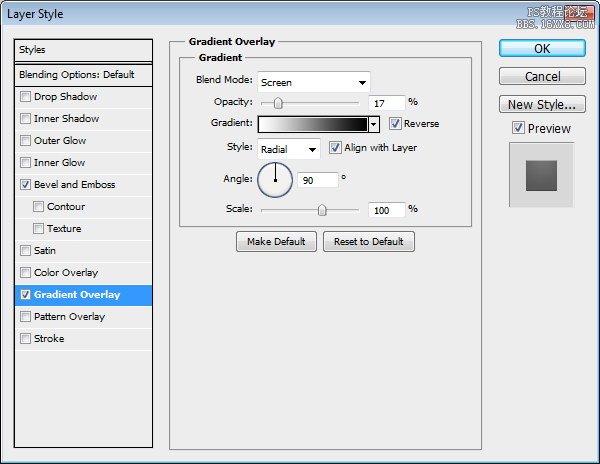
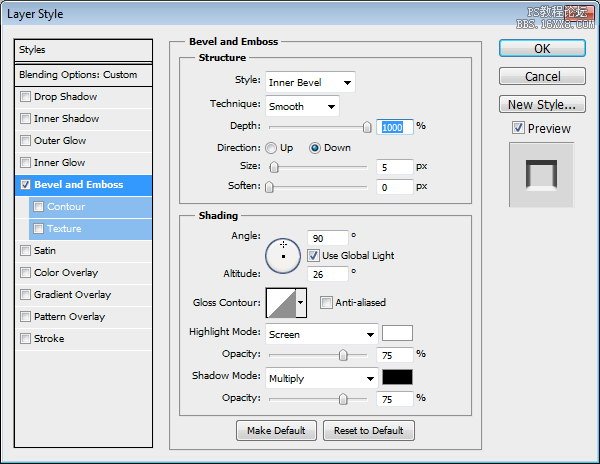
Next,create a ring shape. To create this shape, start with a regular circle shape,duplicate the path and transform it to smaller size. Set path mode to Subtract.Add Bevel and Emboss and Gradient Overlay.
接下來,形成一個環(huán)的形狀。要創(chuàng)建此形狀,開始一個規(guī)則的圓形形狀,復(fù)制路徑并將其轉(zhuǎn)換為更小的尺寸。設(shè)置路徑模式,以減法。添加斜面和浮雕和漸變疊加。
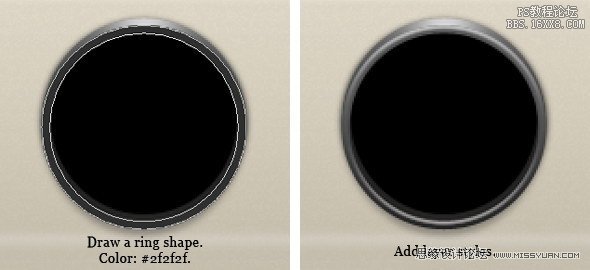


Step 32
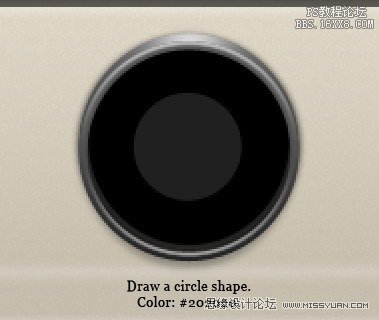
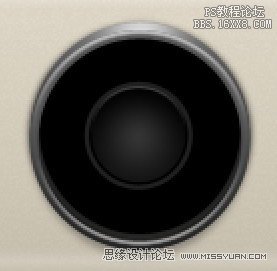
We willstart drawing inner part of the lens. First, I want you to know that they arejust simply lots of circle shapes combined with layer style. Draw a circleshape inside the lens.
我們將開始繪制的鏡頭內(nèi)部。首先,我想讓你知道,他們只是簡單的圓形狀與圖層樣式結(jié)合地段。鏡頭內(nèi)畫一個圓圈形狀。
Step 33
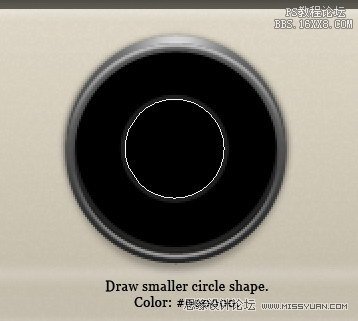
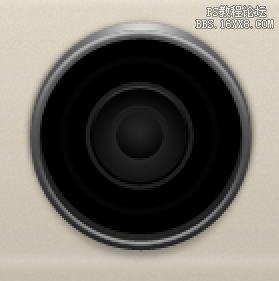
Again,draw smaller circle shape. Add Bevel and Emboss and Gradient Overlay.
同樣,畫小圓圈形狀。添加斜面和浮雕和漸變疊加。
Step 34
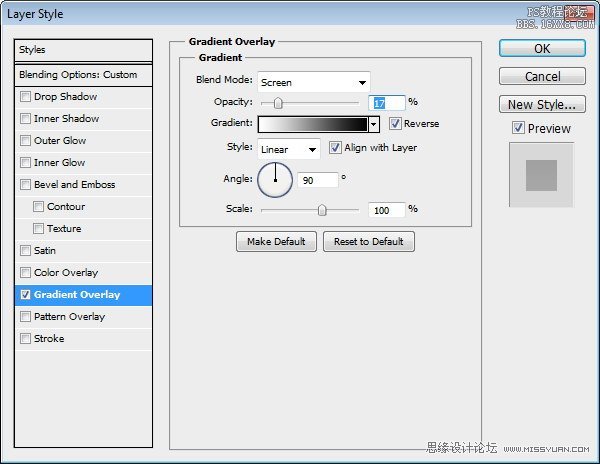
Duplicateshape we have just created. Resize it to 98%. Delete all its layer styles andadd Gradient Overlay with this setting.
重復(fù)的形狀我們剛剛創(chuàng)建的。調(diào)整到98%。刪除其所有的圖層樣式并添加此設(shè)置漸變疊加。
Step 35
Duplicatetwo circle shapes that we have created in Step 32 – Step 34. Resize them to asmaller size.
重復(fù)的兩個圓圈的形狀,我們已經(jīng)創(chuàng)建在步驟32- 步驟34。調(diào)整到一個較小的大小。
Step36
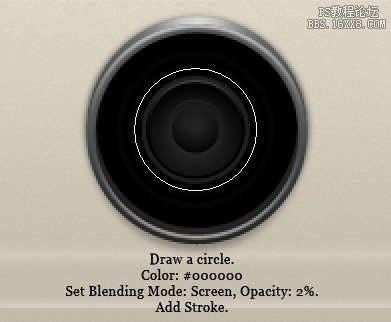
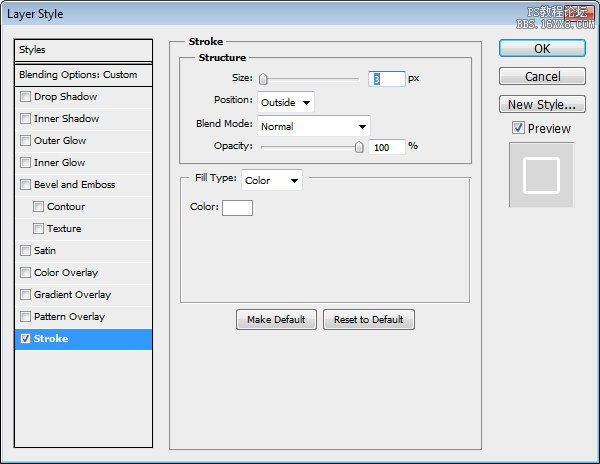
Drawa bigger circle shape from the same origin. Place it behind other circleshapes. Set Blend Mode layer to Screen, reduce its Opacity to 2%, and addStroke.
吸取更大的圓形狀相同的起源。圓形狀落后于其他地方了。設(shè)置混合模式為濾色層,減少其不透明度為2%,并添加描邊。
Step 35
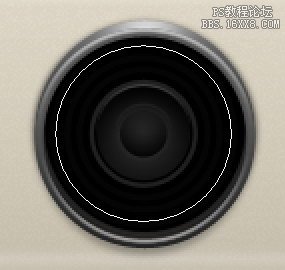
Duplicateand resize shape a few times to create more lines. Remember that the Opacity ofthese shapes is only 2%, very subtle.
復(fù)制并形成了幾次調(diào)整,創(chuàng)造更多的行。請記住,這些形狀不透明度只有2%,非常微妙。
Step 36
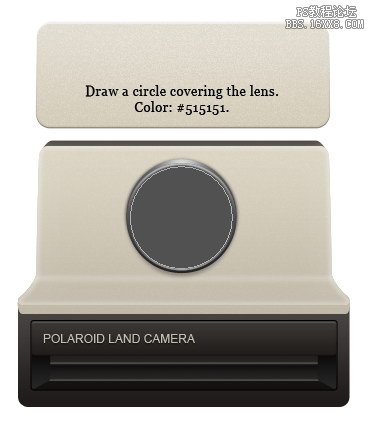
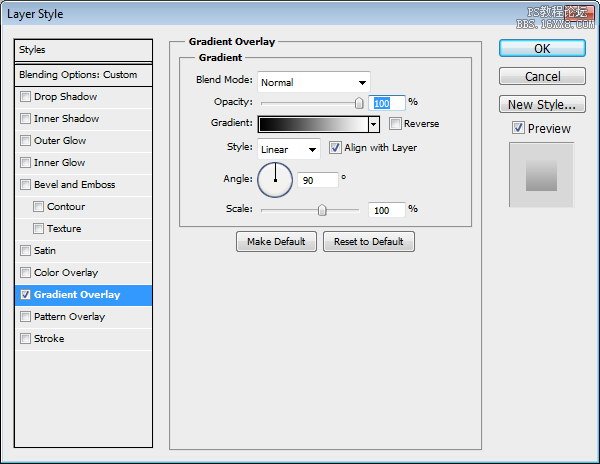
Draw acircle shape with color #515151 covering the lens. Add Gradient Overlay andreduce its Opacity to 38%.
繪制一個圓形顏色#515151涵蓋鏡頭。添加漸變疊加,并減少其不透明度為38%。
Step 37
Let’sadd highlight and shadow to make it more realistic. Create a circular selectioncovering the lens. Create new group then click Add Layer Mask icon.
讓我們添加高光和陰影,使之更加切合實際。創(chuàng)建一個圓形選區(qū)覆蓋的鏡頭。創(chuàng)建新組,然后單擊添加圖層蒙板圖標。

Step 38
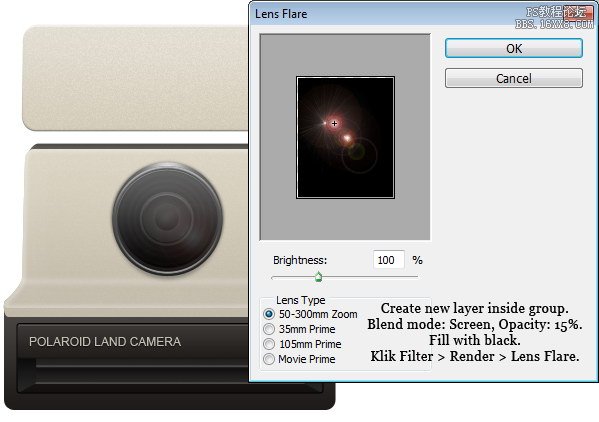
Createnew layer and make sure it is inside the group we have just created. Fill layerwith black. Click Filter > Render > Lens Flare. Change blend mode toScreen and reduce Opacity to 15%.
創(chuàng)建新層,并確保它在我們剛才創(chuàng)建的組中。用黑色填充層。點擊“濾鏡>渲染“鏡頭眩光。改變混合模式為屏幕,不透明度降低到15%。
Step 39
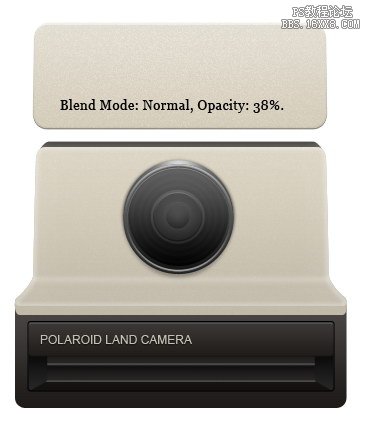
Createnew layer and paint highlights on the lens. Reduce layer Opacity to 10%.
創(chuàng)建新層和油漆突出的鏡頭。降低圖層不透明度為10%。
Step 40
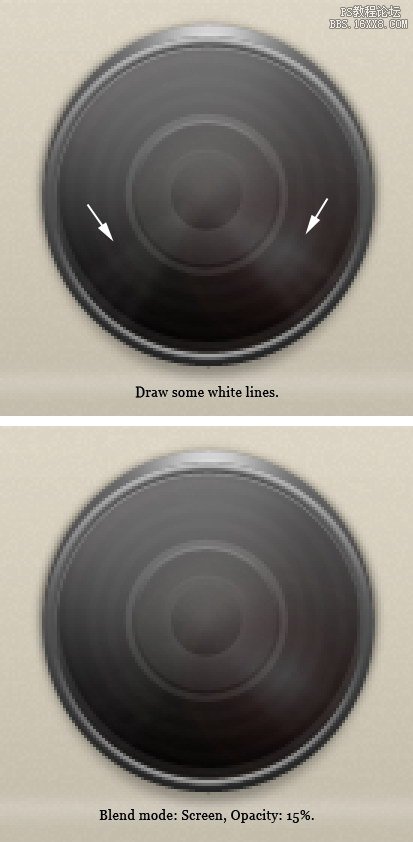
Usesmaller brush to draw some lines on the lens. Change layer blend mode to Screenand reduce Opacity to 15%.
使用較小的畫筆繪制鏡頭上的一些行。更改圖層混合模式為屏幕,不透明度降低到15%
Step 41
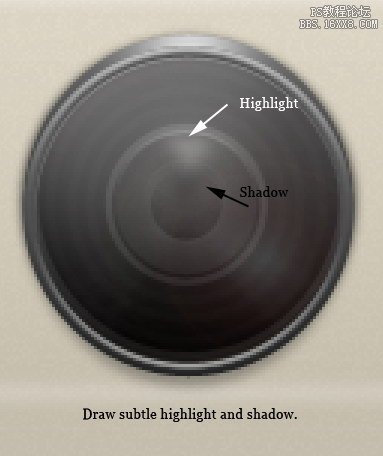
Drawanother layer and draw a small highlight and shadow.
繪制另一個圖層,畫一個小亮點和陰影。
Step 42:Viewfinder
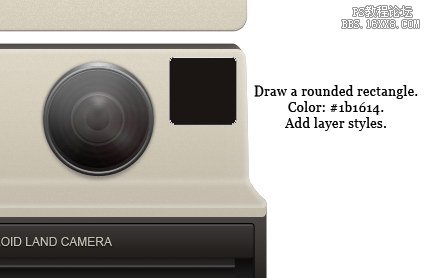
Draw arounded rectangle with color #1b1614. Add following Layer Styles.
繪制一個圓角矩形的顏色#1b1614。新增以下圖層樣式。

Step 43
Drawsmaller rounded rectangle. Add following Layer Styles.
繪制小圓角矩形。新增以下圖層樣式。
Step 44
Duplicatecircle shapes from lens and resize it until it fit inside the viewfinder.Create a new layer on top of the circle and draw some subtle highlights.
從鏡頭重復(fù)的圓圈形狀和大小,直到它里面的取景器適合。創(chuàng)建一個圓形的頂新圖層,畫一些微妙的亮點。
Step 45:Button
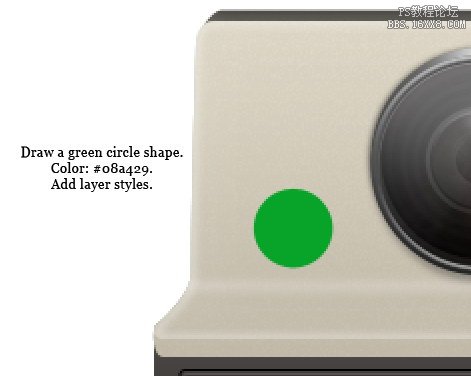
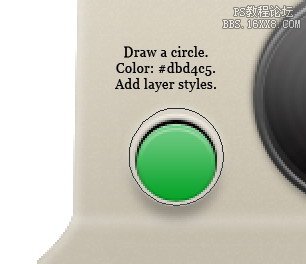
Draw agreen circle shape. Add following Layer Styles.
畫一個綠色的圓形。新增以下圖層樣式。


Step 46
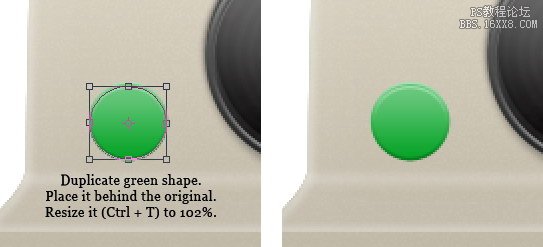
Duplicatethe green circle shape. Place it behind the original shape. Resize it to 102%.
重復(fù)的綠色圓形。放置在原始形狀的后面。調(diào)整其大小至102%。
Step 47
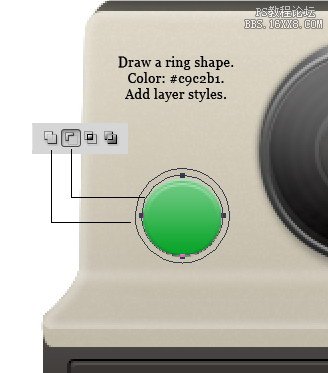
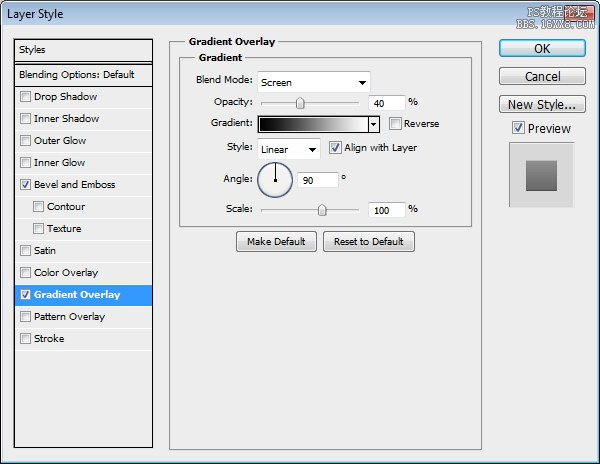
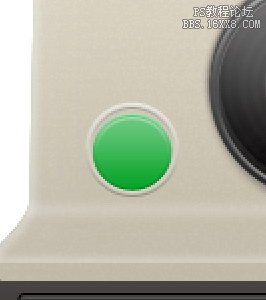
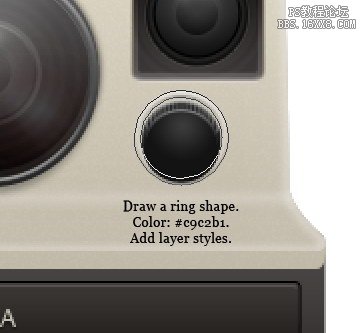
Draw aring shape with color #c9c2b1. Add following layer styles.
繪制一個顏色#c9c2b1環(huán)的形狀。新增以下圖層樣式。

Step 48
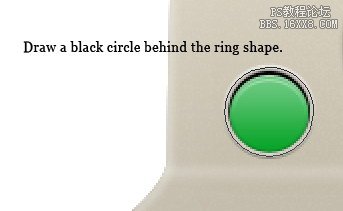
Draw ablack circle and put it behind the ring shape. This will add depth onto thering and make it seems like a hole.
畫一個黑圈,把后面的戒指形狀。這將添加到環(huán)深度,它看起來像一個洞。
Step49
Createnew layer and place it behind all other button shapes. Draw a soft shadow.
創(chuàng)建新層,把后面的所有其他按鈕的形狀了。畫一個軟陰影。

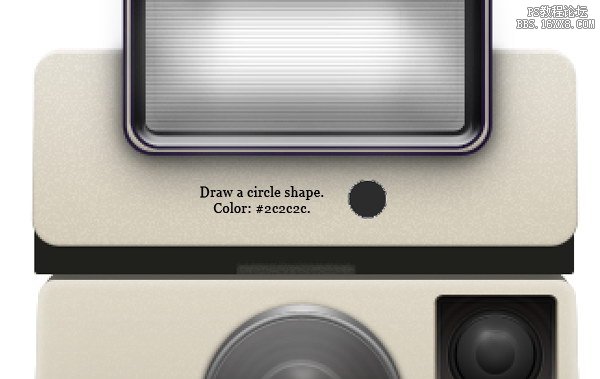
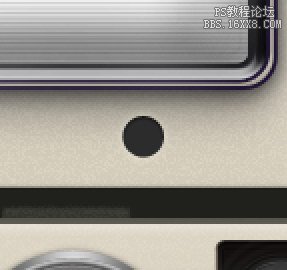
Step 50
Draw acircle shape. Add Layer Styles Outer Glow.
畫一個圓的形狀。添加圖層樣式外發(fā)光。
Step 51: Knob
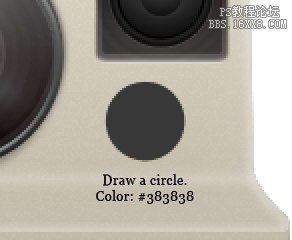
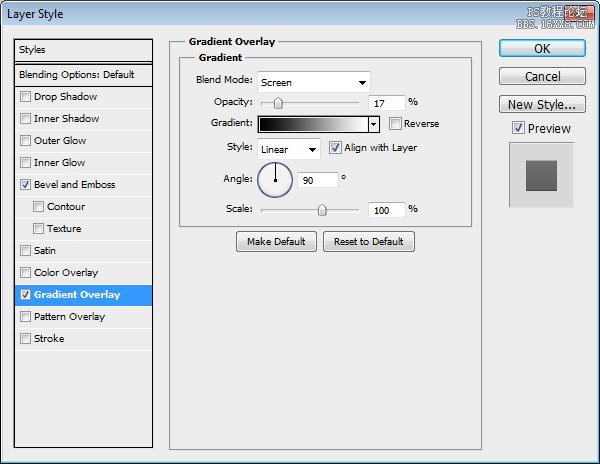
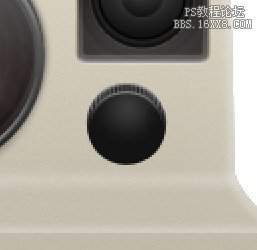
Let’s continue with the second button. Draw another circle, this time use #383838 as its color. Add following Layer Styles.
讓我們繼續(xù)第二個按鈕。繪制另一個圈子,這一次使用它的顏色#383838。新增以下圖層樣式。

Step 52
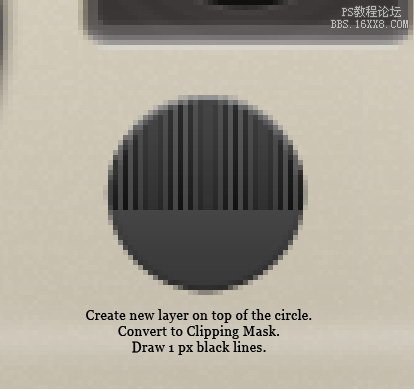
Create new layer on top of the circle. Hit Command/Ctrl + Alt + G to convert it to Clipping Mask. Draw lots of 1 px black vertical lines.
對創(chuàng)建新層圈頂部。點擊命令/按Ctrl + Alt+
G以將其轉(zhuǎn)換為剪貼蒙版。畫出1像素的黑色垂直線地段。
Step 53
Draw a darker circle on top of the previous circle. Add following Layer Styles.
繪制一份關(guān)于先前的循環(huán)圈最黑暗的。新增以下圖層樣式。

Step 54
Draw a ring shape behind the knob and add following layer styles.
畫一個圈背后的旋鈕的形狀和添加圖層樣式如下。


Step 55
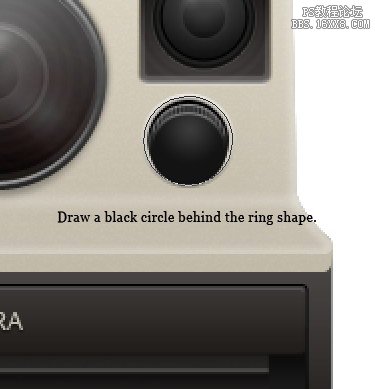
Draw a black circle behind the ring shape.
后面畫一個圈形黑圈。
Step 56
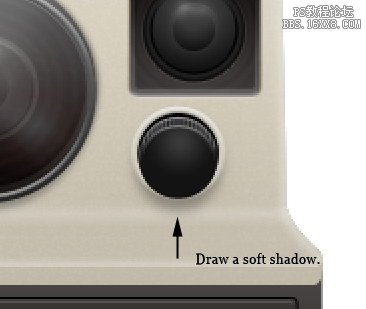
Use soft brush to draw soft shadow under the button.
使用軟刷會根據(jù)該按鈕軟陰影。
Step 57
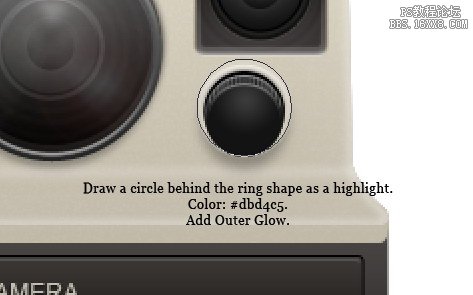
Draw a circle shape behind the ring. Add Outer Glow.
后面畫一個圓形的環(huán)。添加外發(fā)光。


Step 58: Flash
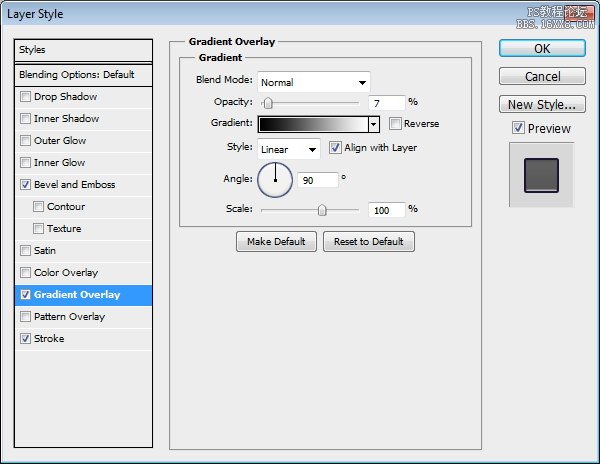
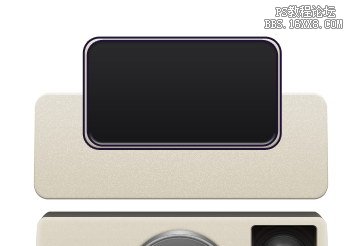
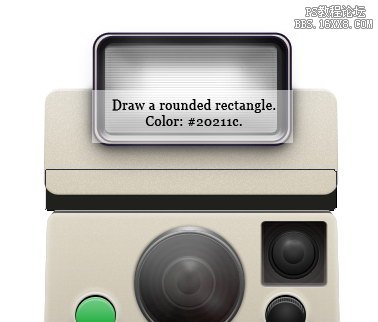
Draw a rounded rectangle. Add these layer styles.
畫一個圓角矩形。新增這些圖層樣式。


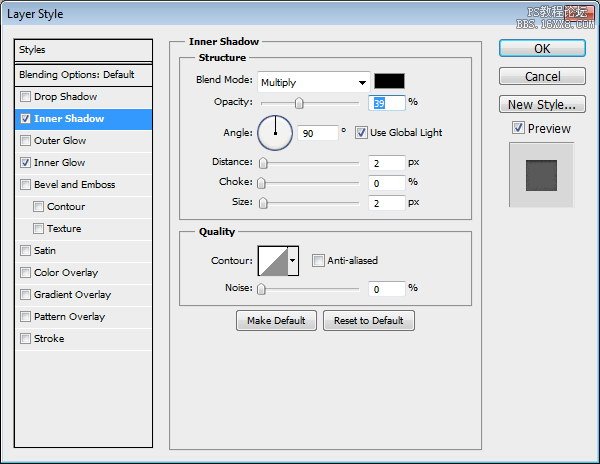
Step 59
Draw smaller rounded rectangle. Add following Layer Styles.
繪制小圓角矩形。新增以下圖層樣式。
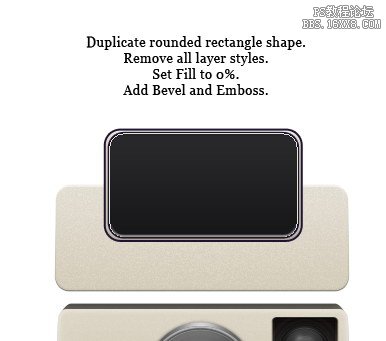
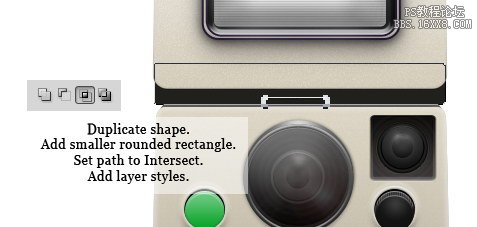
Step 60
Duplicate shape we have just created. Remove all Layer Styles used. Set Fill layer to 0% then add Layer Style Bevel and Emboss.
重復(fù)的形狀我們剛剛創(chuàng)建的。刪除所有圖層樣式使用。填充層設(shè)置為0%,然后添加圖層樣式斜面和浮雕。
Step 61
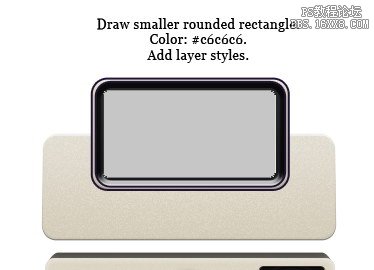
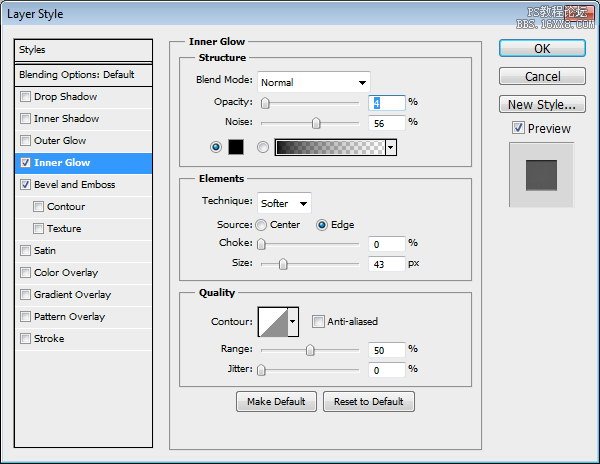
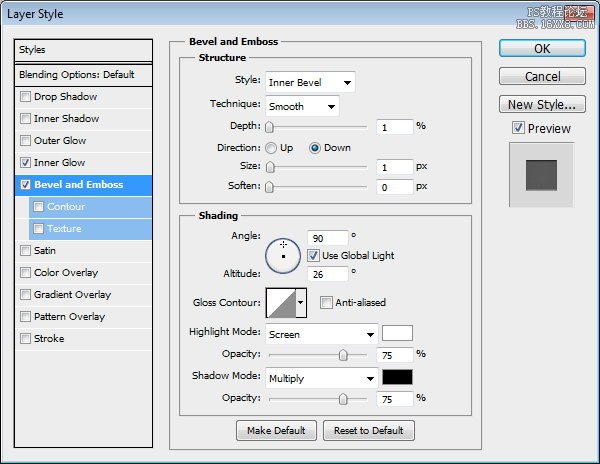
Draw a smaller rounded rectangle, color: #c6c6c6. Add Inner Glow and Bevel and Emboss.
繪制一個較小的圓角矩形,顏色:#c6c6c6。添加內(nèi)發(fā)光和斜面和浮雕。
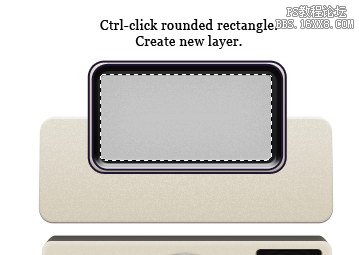
Step 62
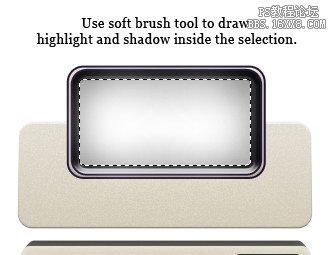
Command/Ctrl-click rounded rectangle layer. Create new layer. Use soft brush to draw some highlights and shadows. See picture below for reference.
命令/按住Ctrl單擊圓角矩形層。創(chuàng)建新的圖層。使用軟刷得出一些亮點和陰影。見下面的圖片,以供參考。
Step 63
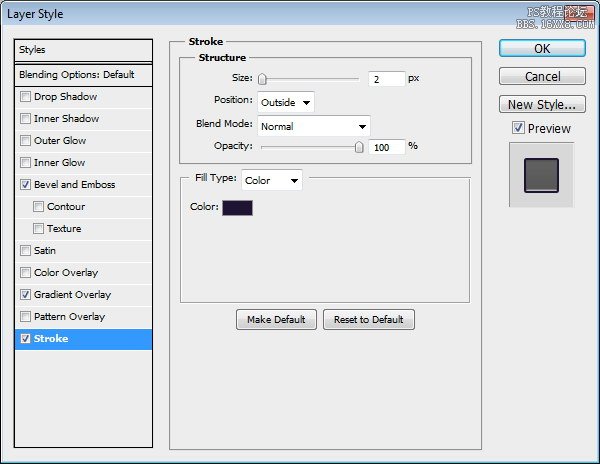
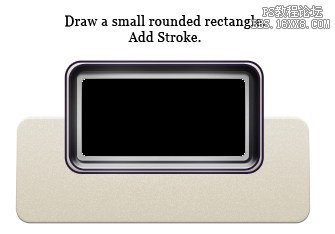
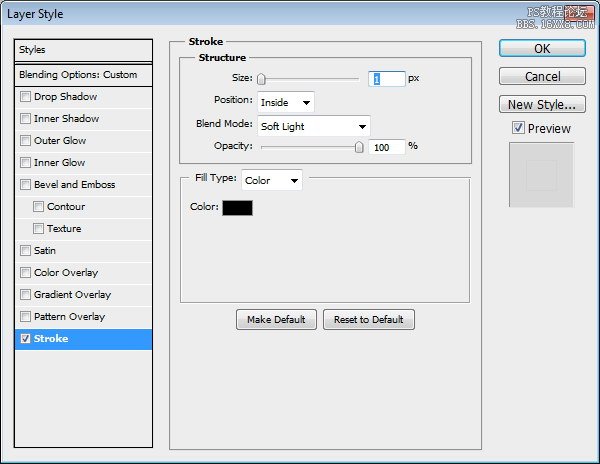
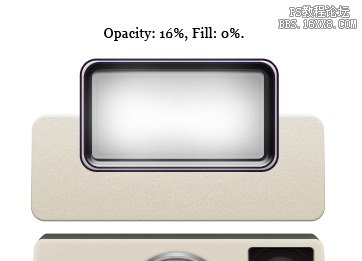
Draw smaller rounded rectangle. Add Stroke. Change layer’s Opacity to 16% and Fill to 0%.
繪制小圓角矩形。新增行程。更改圖層的不透明度為16%,填充為0%。
Step 64
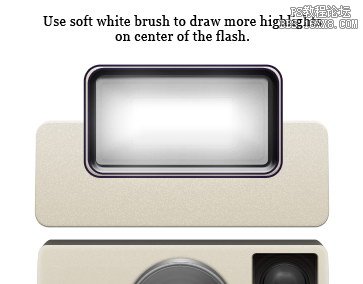
Use soft brush to draw more highlights on center of the flash.
使用軟毛刷,以吸引更多的閃光燈的中心亮點。
Step 65
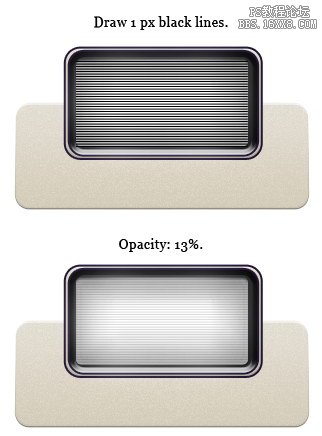
Create new layer. Draw 1 px black lines. Reduce layer Opacity to 13%.
創(chuàng)建新的圖層。畫一像素的黑線。降低圖層不透明度為13%。
Step 66
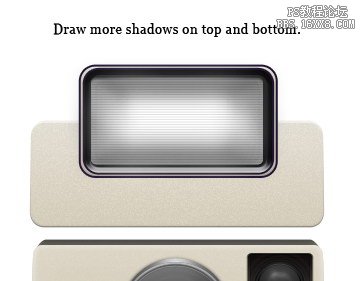
Draw more shadows on top bottom of the flash surface.
畫出閃光表面頂?shù)赘嗟年幱啊?/p>
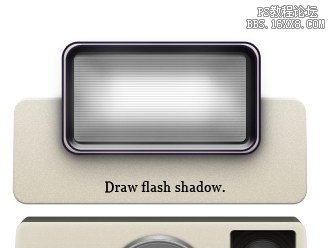
Step 67
Create new layer and place it under the flash. Use soft brush to draw flash shadow.
創(chuàng)建新圖層,置于閃存。使用軟刷畫閃光陰影。
Step 68: Rear Part
Draw a rounded rectangle. Place it behind all shapes.
畫一個圓角矩形。它的形狀放在背后。
Step 69
Duplicate shape. Add smaller rounded rectangle and from the option bar set it to Intersect. See picture below for its placement. Add following Layer Styles.
重復(fù)的形狀。新增小圓角矩形,并從選項欄中設(shè)置為相交。其位置見下面的圖片。新增以下圖層樣式。

Step 70: AF Light
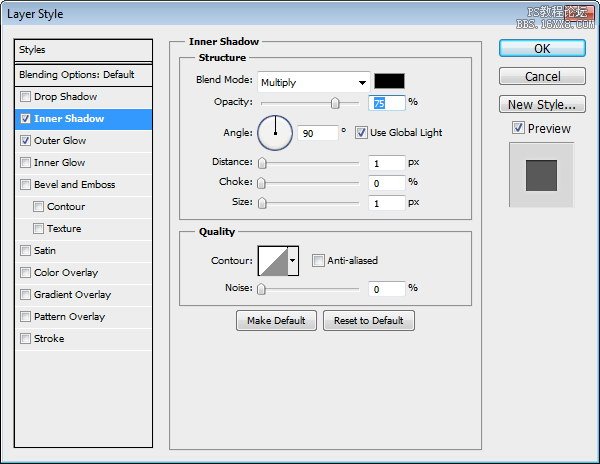
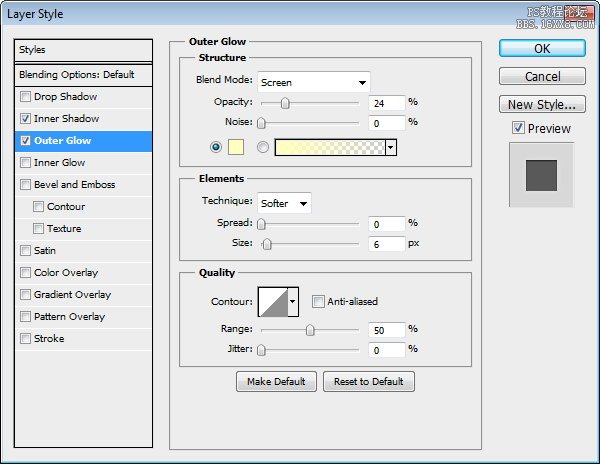
Draw a circle under the flash. Add Inner Shadow and Outer Glow.
閃光燈下畫一個圈。添加內(nèi)陰影,外發(fā)光。
Step 71
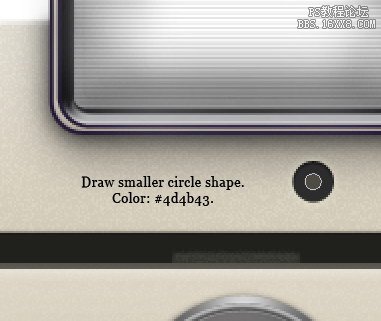
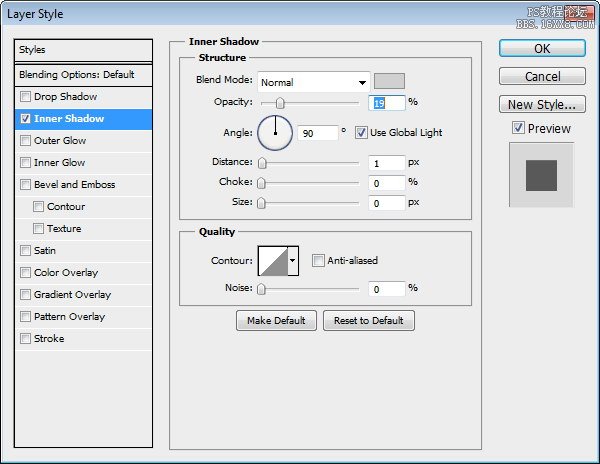
Draw smaller circle shape inside previous shape with color #4d4b43. Add Inner Shadow.
較小的內(nèi)畫顏色#4d4b43與原來形狀圓形。添加內(nèi)陰影。
Step 72: Camera Label
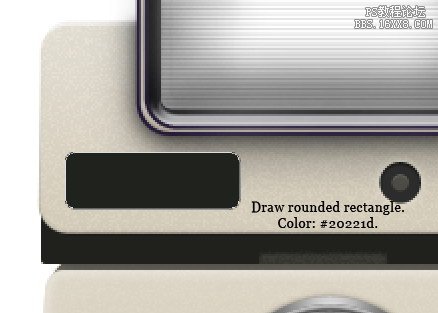
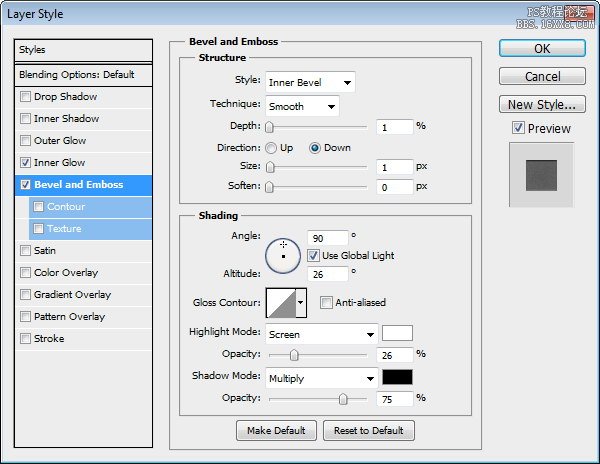
Draw a rounded rectangle on lower left of the camera. Add Inner Glow and Bevel and Emboss. Add camera name inside the rounded rectangle.
在較低的相機留下了一個圓角矩形。添加內(nèi)發(fā)光和斜面和浮雕。相機內(nèi)部添加圓角矩形的名稱。


Step 73: Selector
Draw a rounded rectangle on the opposite side. Add Inner Glow and Bevel and Emboss.
上繪制一個圓角矩形對面。添加內(nèi)發(fā)光和斜面和浮雕。
Step 74
Draw a rectangle in the middle of the shape. Add Gradient Overlay and Drop Shadow.
畫在中間長方形的形狀。添加漸變疊加和陰影。


Step 75
Activate pen tool. Click lower side of the rectangle to add new point. Use Direct Selection Tool to pull it down.
激活鋼筆工具。按較低的矩形的邊添加新的點。使用直接選擇工具把它拉下來。

Step 76
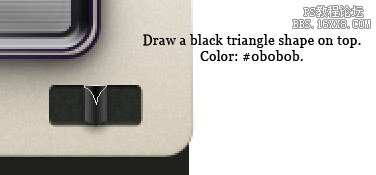
Draw a dark triangle shape.
繪制一個黑色三角形。
Step 77
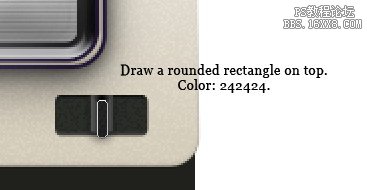
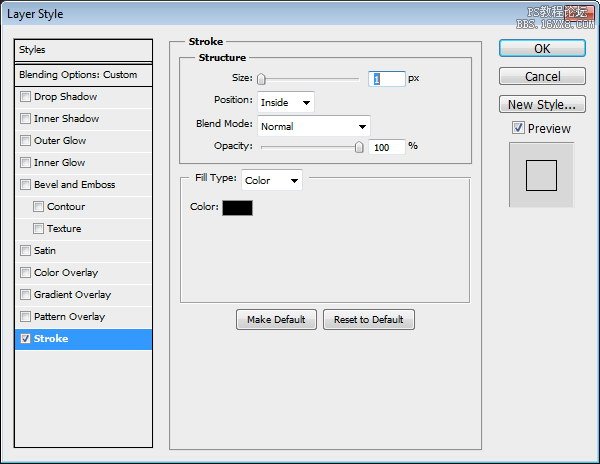
On top of the shape we have just created, draw a dark rounded rectangle. Add Layer Style Stroke.
論我們剛才創(chuàng)建的形狀的頂部,繪制一個黑暗的圓角矩形。添加描邊圖層樣式。
Step 78
Draw circles and triangle for knob indicator.
繪制圓和三角形旋鈕指標。

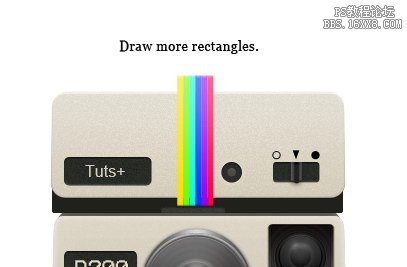
Step 79: Colorful Ribbon
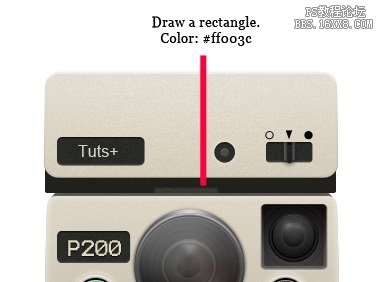
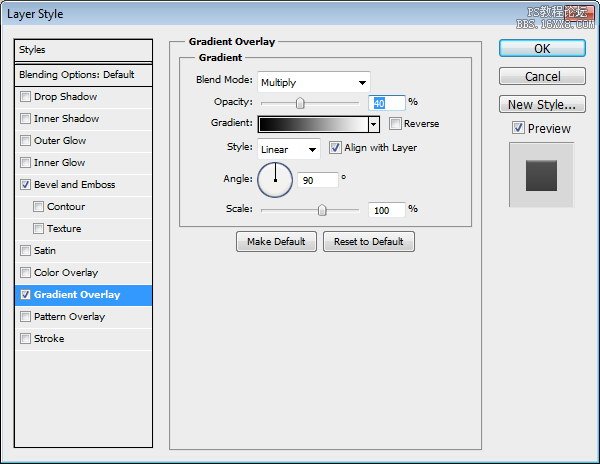
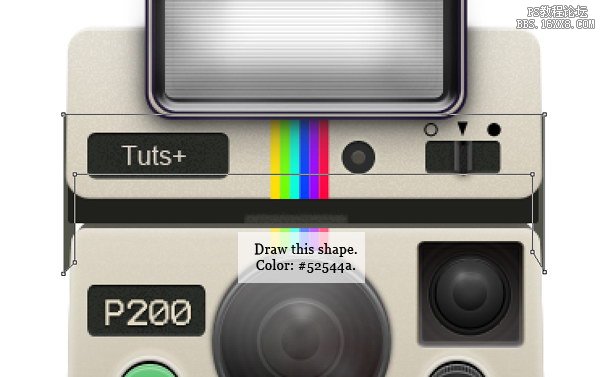
Our next step is drawing colorful ribbon across upper part of the camera body. Temporarily, hide flash. First, draw a tall red rectangle. Add Gradient Overlay to avoid flat color and Bevel and Emboss to give it three-dimensional appearance.
我們的下一步是在繪制多彩的機身上部剪彩。暫時隱藏閃光。首先,畫一個高大的紅色矩形。添加漸變疊加,以避免平面色彩和斜面和浮雕,給它的三維外觀。


Step 80
Duplicate rectangle by Alt-dragging it. Change their color.
重復(fù)按Alt矩形的拖動。改變自己的顏色。
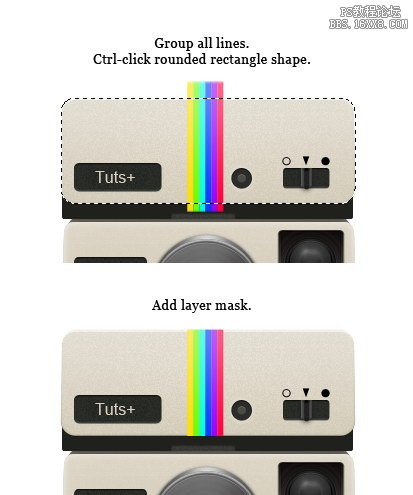
Step 81
Group all lines by selecting all line layers and hit Command/Ctrl + G. Command/Ctrl-click rounded rectangle shape that forms upper part of the camera. Click Add Layer Mask icon. Now, the ribbon is inside upper part of the camera.
組合所有線路全部由多層線路選擇和命中命令/按Ctrl+克命令/
Ctrl鍵單擊圓角矩形形狀,形式,相機上部。點擊添加圖層蒙板圖標。現(xiàn)在,色帶是在相機內(nèi)的上部。
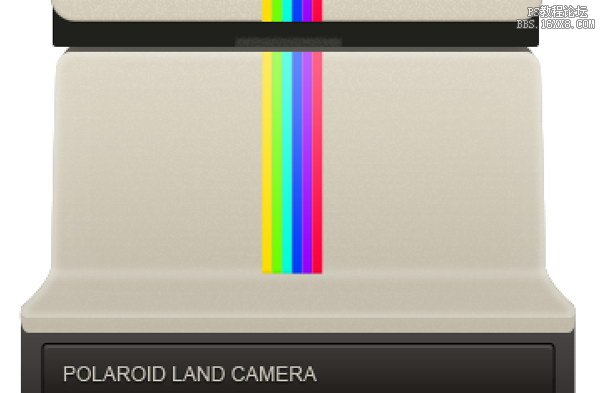
Step 82
Repeat previous steps to add another ribbon on middle part of the camera.
重復(fù)前面的步驟添加另一個攝像機的中間部分剪彩。
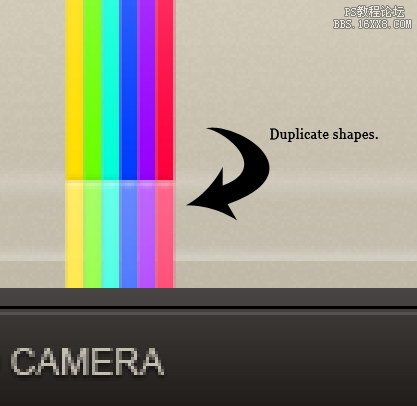
Step 83
Duplicate shapes and put them on lower part of the camera.
重復(fù)的形狀,放在降低了相機的一部分。
Step 84
For these ribbons, change their Gradient Overlay mode from Screen to Multiply.
對于這些絲帶,改變他們的梯度,屏幕疊加模式為疊加。
Step 85
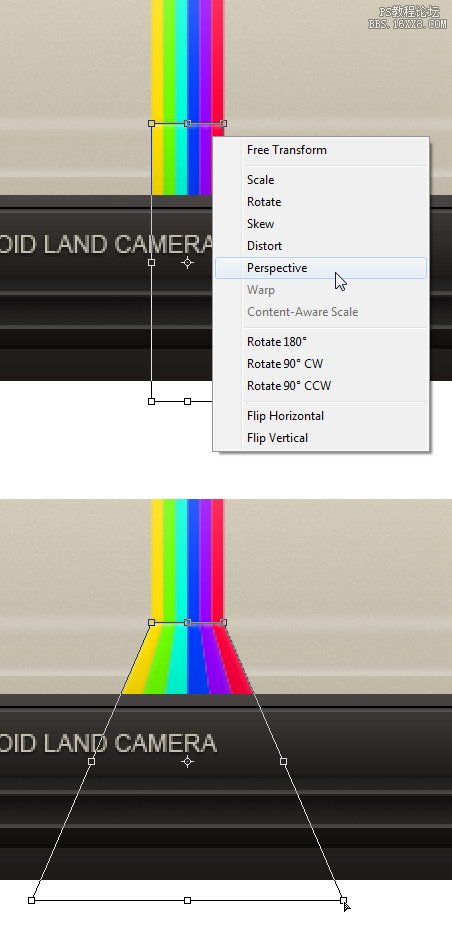
Select the ribbon group. Hit Command/Ctrl + T to perform transformation. Right click and choose Perspective. Pull lower corner. See picture below for reference.
選擇色帶組。點擊命令/按Ctrl + T進行改造。右擊并選擇視角。拉右下角。見下面的圖片,以供參考。
Step 86
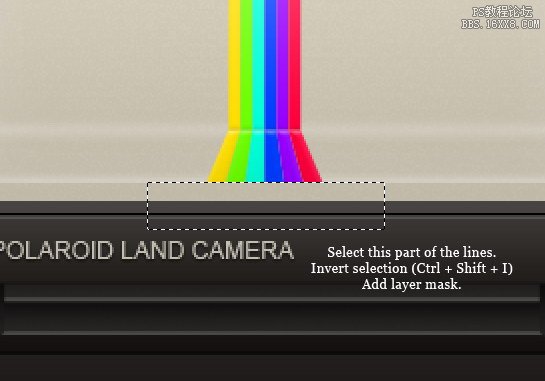
Select lower part of the ribbon. Invert selection by pressing Command/Ctrl + Shift + I then click Add Layer Mask icon.
選擇較低的緞帶的一部分。反轉(zhuǎn)按命令/按Ctrl + Shift+I的選擇,然后單擊添加圖層蒙板圖標。
Step 87
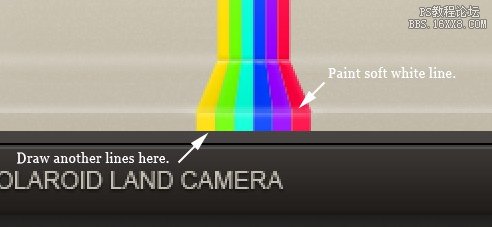
Duplicate colorful ribbon group, resize it, and place it under the previous ribbon. Paint soft white line on some part of the ribbon to give it three-dimentional appearance.
重復(fù)的彩帶組,調(diào)整其大小,并將其放置在前面的緞帶。漆軟一些功能區(qū)的一部分的白線,以給它三維立體外觀。
Step 88
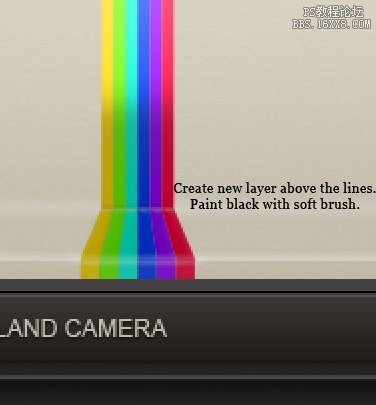
Create new layer above the ribbon. Paint black using soft brush with low Opacity to add depth onto the ribbon.
創(chuàng)建新層以上剪彩。涂料用低透明度黑色軟刷上添加功能區(qū)的深度。
Step 89: Photo
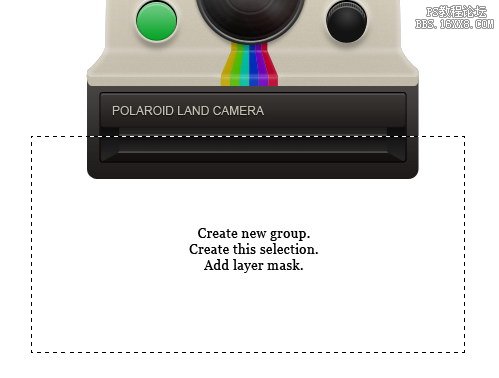
Create new group for the photo. See picture below for reference on its position. Draw rectangular selection in front of the camera. Click Add Layer Mask icon.
創(chuàng)建新組照片。見自己的立場參考下面的圖片。繪制在鏡頭前矩形選區(qū)。點擊添加圖層蒙板圖標。
Step 90
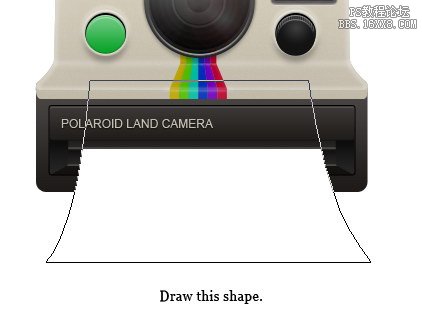
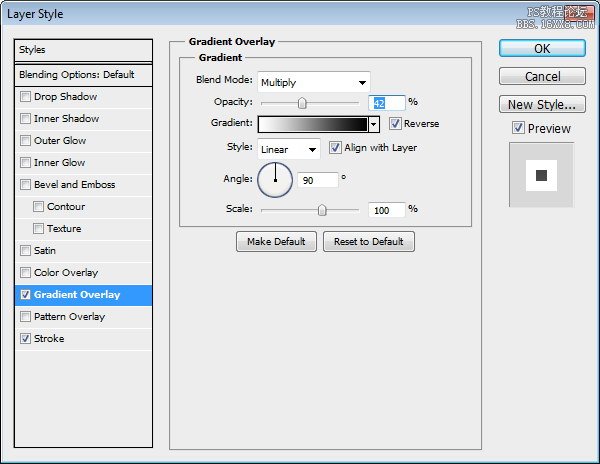
Use pen tool to draw basic shape of a photo. Add Gradient Overlay to avoid flat color and Stroke to add photo border, which is the characteristic of a Polaroid photo.
使用鋼筆工具繪制一張照片的基本形狀。添加漸變疊加,以避免平面彩色和中風(fēng)添加照片邊框,這是一個寶麗來照片的特點。


Step 91
Grab an image for the photo. I used a photo fromsxc.hu. Place the image right above the photo shape. Convert layer to Clipping Mask by pressing Command/Ctrl + Alt + G. The image will automatically goes inside the photo.
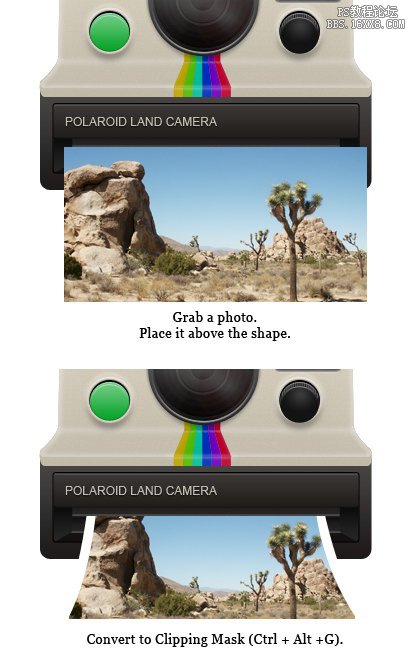
Step 92
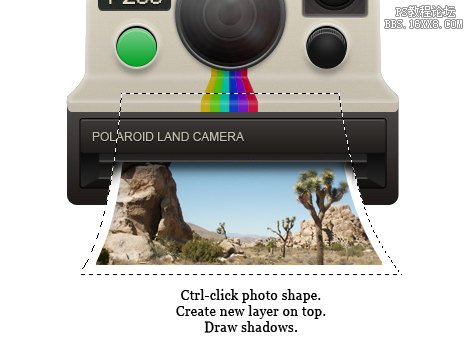
Command/Ctrl-click photo shape. Create new layer above the image. Draw shadow on the photo.
命令/
按住Ctrl單擊照片的形狀。創(chuàng)建新層以上的圖像。照片上繪制陰影。
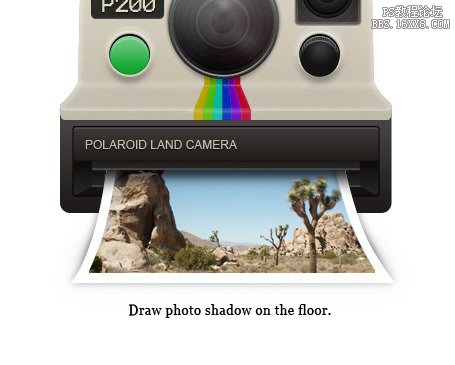
Step 93
Create new layer and put it under the photo shape. Use soft brush tool to draw photo shadow on the floor.
創(chuàng)建新圖層并把照片下形狀。使用軟刷工具畫在地板上照片的陰影。
Step 94: Camera Strap
Use pen tool to draw this shape. Put it behind the camera.
使用鋼筆工具繪制這個形狀。把后面的相機。
Step 95
Next, draw a big rounded rectangle. Pull two points on lower side up. Add a rectangle path and set it to Subtract mode.
接下來,畫一個大圓角矩形。下側(cè)拉兩個百分點。添加一個矩形路徑并將其設(shè)置為減去模式。

Step 96: Shadows
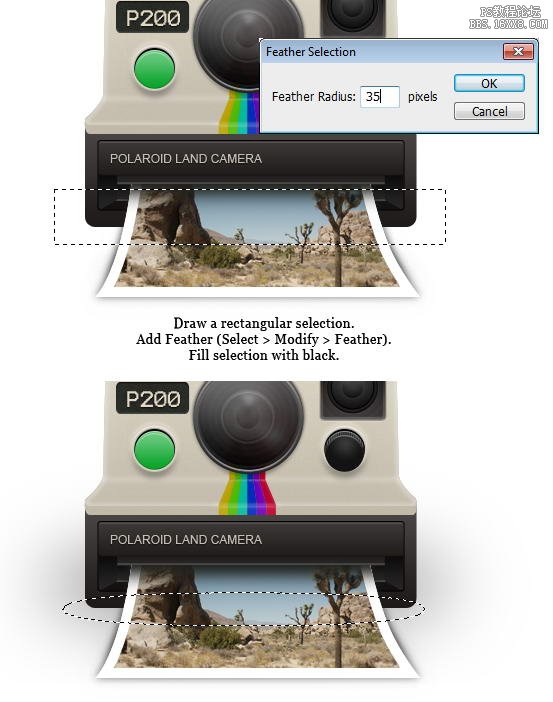
Create new layer and place it under all layers. Draw a rectangular selection under the camera. Click Select > Modify > Feather, set radius to 35 pixels. Fill selection with black.
創(chuàng)建新圖層,它置于所有圖層。繪制一個矩形選擇下的攝像頭。點擊選擇“>“修改>
羽化,設(shè)置半徑為35
像素。選擇填充黑色。
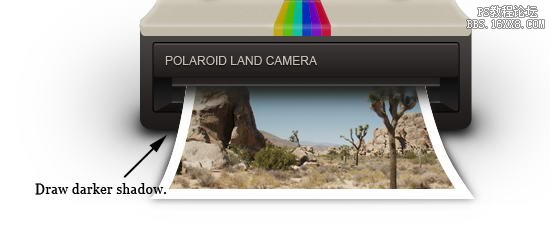
Step 97
Use brush tool to draw darker shadow right under the camera.
使用畫筆工具繪制較深的陰影下,相機的權(quán)利。
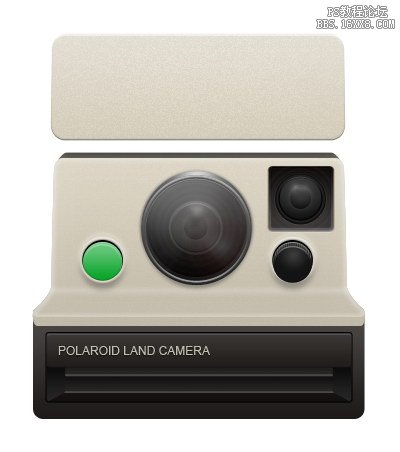
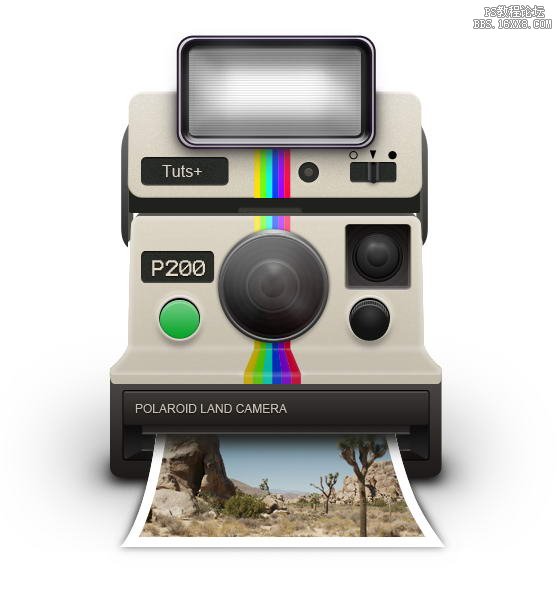
Final Image
Finally, we have reached the end. Here’s the final polaroid camera icon we have just created. I hope you enjoy this tutorial and learn some new techniques.
最終圖像
最后,我們走到了盡頭。下面是最后寶麗來相機圖標我們剛剛創(chuàng)建的。我希望你喜歡這個教程,學(xué)習(xí)一些新的技術(shù)。

網(wǎng)友評論