photoshop設計時尚泡泡壁紙教程
時間:2024-02-05 09:45作者:下載吧人氣:30
作者xyzk 出處:Iconfans
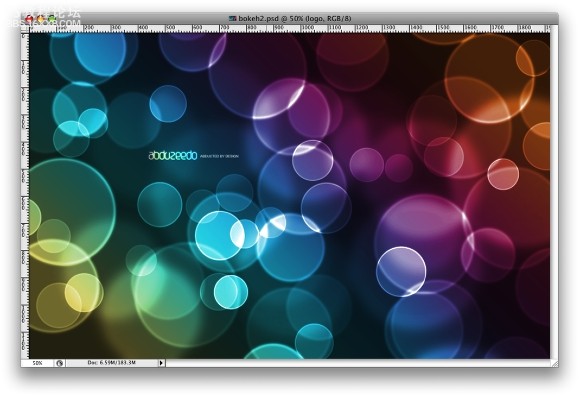
先看看最終效果
以下是詳細的photoshop教程步驟:
Step 1
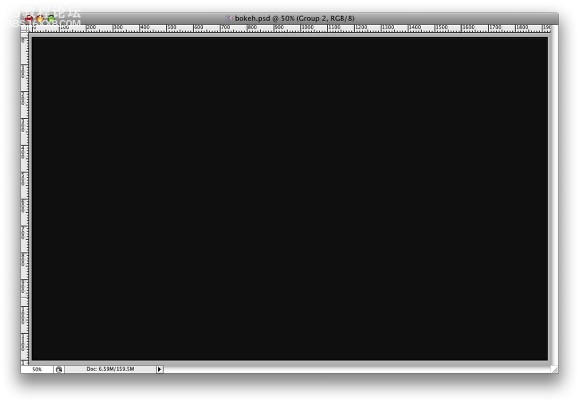
Createa new document in photoshop. As usual I will use a nice screeresolution, 1920x1200 pixels. Fill the background layer with a verydark grey, not black. If you fill it with black the effect won't work.The color I used was #262626.
第1步
在photoshop中創建新文檔,大小是1920x1200,背景層填充一個較深色的灰,注意要是深灰色,不能純黑,否則無法出效果。比如可以填個#262626。
Step 2
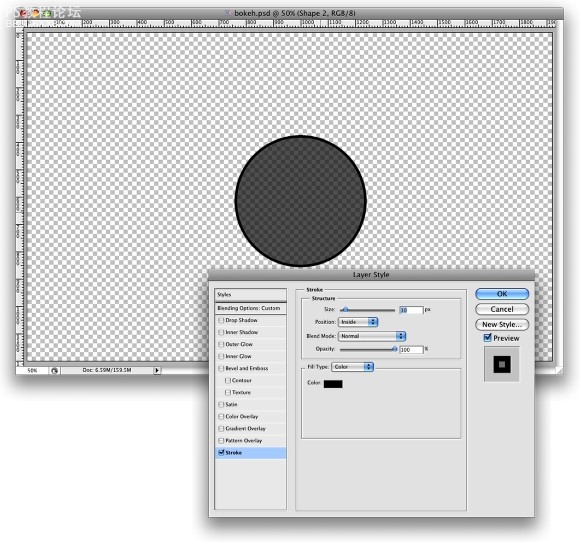
Selectthe Ellipse Tool (U), and create a circle. Use black for the color, andgo to Layer Layer Style Blending Options. Change the Fill Opacityto 50%. After that select Stroke. Use 10 pixels for the size, Insidefor the Position and Black for the color.
第2步
選形狀工具(U)里面的橢圓,在新圖層中用黑色畫一個正面,在圖層填充不透明度為50%。設置圖層描邊效果,大小10像素,位置內部,顏色黑色。
Step 3
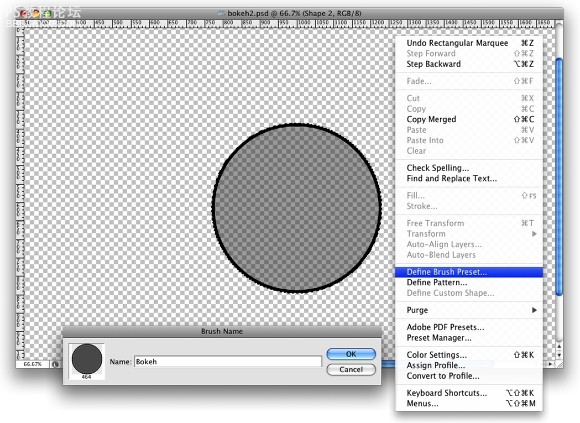
Select the ellipse and go to Edit Define Brush. Name your brush and that's done. Now we have a new brush ;)
第3步
隱藏背景層,橢圓層處選中狀態,選擇“編輯”菜單-“定義畫筆預置”,取個名,按確定,這樣就定義好了一個新的筆頭。
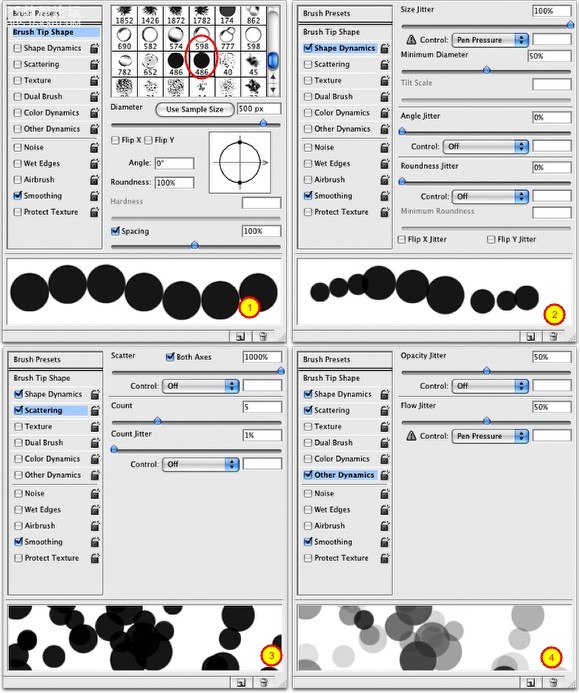
Step 4
Go to Window Brushes (F5). The first thing to do inthe Brush Engine is to select our new Brush. The size won't matterbecause you will change that when you use it. The Spacing, however, isvery important. Chage the value to 100%. After that, select the ShapeDynamics, then Scattering and Other dynamics. For the values use theimage below.
第4步
選擇畫筆工具,F5打開畫筆面板,筆頭設置成剛才定義的新筆頭,大小隨意因為我們可以隨時更改。“畫筆筆尖形狀”里面的“間距”設置100%。“形狀動態”“散布”和“其它動態”的參數按照下圖設置。
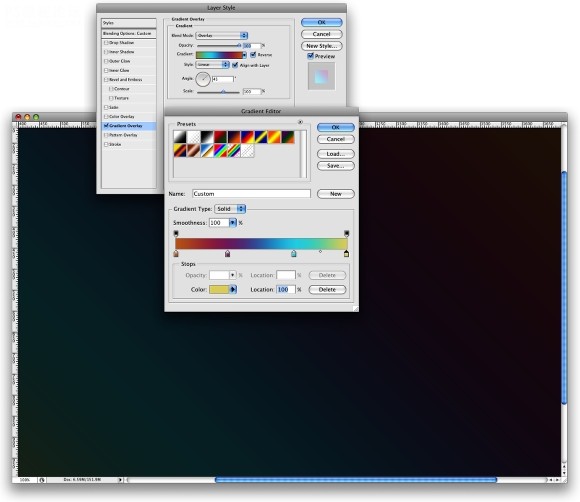
, Step 5
Beforewe start painting our bokehs let's create a new layer and fill it witha colorful gradient. I created a new layer and used the layer styles todo that but feel free to do the way you are used to. My gradientsettings are as follows: Blend Mode is Overlay, Opacity is 100%, Styleis Linear, and the Angle is 45º. The colors I used are: Yellow(#00085), Cyan (#1bdaeb), Purple (#9b3b81), Orange (#d27e34).
第5步
隱藏橢圓圖層,打開背景層。在進行噴繪這前,我們來創建一個新圖層,隨便填個色彩。接著使用圖層效果的漸變疊加,漸變的設置如下:漸變混合模式是疊加,不透明度100%,樣式是線性,角度45,使用的顏色:黃(#00085),青(#1bdaeb),紫(#9b3b81), 橙(#d27e34)。
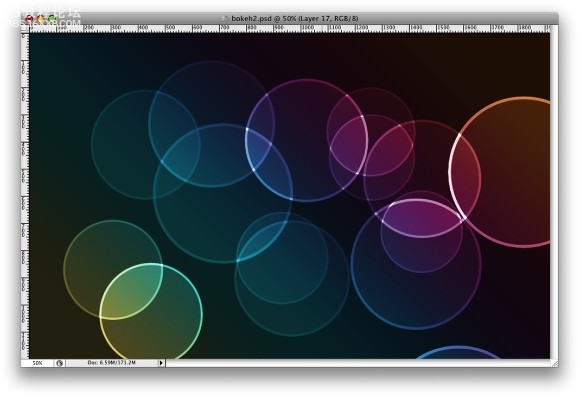
Step 6
Let'screate a new Folder in our Layer Palette. Rename the folder to Bokehsand change the Blend Mode to Color Dodge. Then create a new layer,choose white for the color and select the Brush Tool (B). Now justpaint some ellipses with our custom brush. For this first layer use abig size, like 500-600px.
第6步
讓~我們~在漸變圖層底下新建一個圖層組,取名是“Bokehs”,更改混合樣式為“顏色減淡”。再在圖層組里面建新圖層,設置前景色為白色,選畫筆工具,大小可以設置在500-600像素,然后可以開始噴繪。
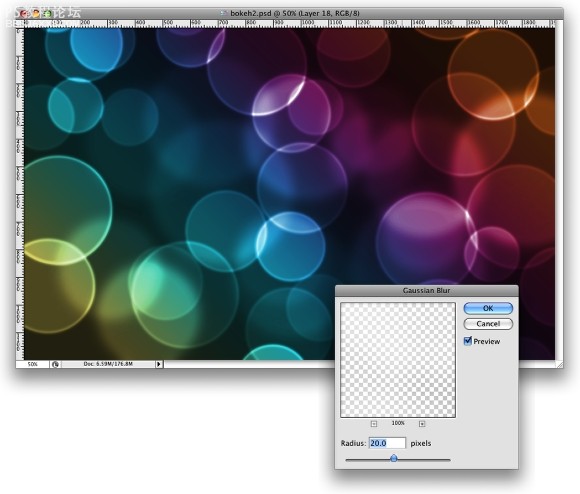
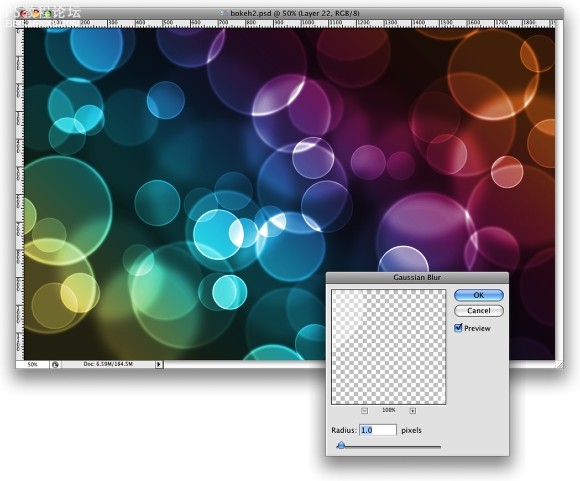
Step 7
Go to Filter Blur Gaussian Blur. For this first layer use 20 pixels for the Radius.
第7步
選擇濾鏡-模糊-高斯模糊,半徑是20像素。

Step 8
Create another layer and paint more brushes. This timehowever use a smaller size for the brush. After that go toFilter Blur Gaussian Blur. Use 4 pixels for the Radius.
第8步
在圖層組里再新建另一個圖層,這次選個小點的筆頭,繼續噴啊噴~!。然后再加上高斯模糊,半徑是4像素。(不同的模糊度是為了得到景深遠近的效果)
, Step 9
Createanother layer and repeat the previous step, this time however use amuch smaller brush. Apply the Gaussian Blur to this layer as well, butuse only 1 pixel for the Radius.
第9步
再建個新圖層,重復上面的操作,這次筆頭設置更小。同樣加上高斯模糊,半徑1像素(可以適當調整畫筆間距和散布的數量)
Conclusion
Nowjust add your logo and that's it. We have a nice wallpaper. The idea ofthis tutorial was once again to show the power of the Brush Engine. Youcan try different shapes for this same effect, like hexagons forexample. Also you can play a bit with the blurs to add more depth tothe final design. Now it's up to you.
最后
再加上我們自己的logo,便完成了這個漂亮的壁紙啦。這個教程再次展示了畫筆引擎功能的強大。我們還可以使用其它筆頭形狀來實現這種效果,比如六邊形,當然我們還可以做出更多的模糊圖層以表現更多的景深效果。那么接下來就看你的了。~!
先看看最終效果
以下是詳細的photoshop教程步驟:
Step 1
Createa new document in photoshop. As usual I will use a nice screeresolution, 1920x1200 pixels. Fill the background layer with a verydark grey, not black. If you fill it with black the effect won't work.The color I used was #262626.
第1步
在photoshop中創建新文檔,大小是1920x1200,背景層填充一個較深色的灰,注意要是深灰色,不能純黑,否則無法出效果。比如可以填個#262626。
Step 2
Selectthe Ellipse Tool (U), and create a circle. Use black for the color, andgo to Layer Layer Style Blending Options. Change the Fill Opacityto 50%. After that select Stroke. Use 10 pixels for the size, Insidefor the Position and Black for the color.
第2步
選形狀工具(U)里面的橢圓,在新圖層中用黑色畫一個正面,在圖層填充不透明度為50%。設置圖層描邊效果,大小10像素,位置內部,顏色黑色。
Step 3
Select the ellipse and go to Edit Define Brush. Name your brush and that's done. Now we have a new brush ;)
第3步
隱藏背景層,橢圓層處選中狀態,選擇“編輯”菜單-“定義畫筆預置”,取個名,按確定,這樣就定義好了一個新的筆頭。
Step 4
Go to Window Brushes (F5). The first thing to do inthe Brush Engine is to select our new Brush. The size won't matterbecause you will change that when you use it. The Spacing, however, isvery important. Chage the value to 100%. After that, select the ShapeDynamics, then Scattering and Other dynamics. For the values use theimage below.
第4步
選擇畫筆工具,F5打開畫筆面板,筆頭設置成剛才定義的新筆頭,大小隨意因為我們可以隨時更改。“畫筆筆尖形狀”里面的“間距”設置100%。“形狀動態”“散布”和“其它動態”的參數按照下圖設置。
, Step 5
Beforewe start painting our bokehs let's create a new layer and fill it witha colorful gradient. I created a new layer and used the layer styles todo that but feel free to do the way you are used to. My gradientsettings are as follows: Blend Mode is Overlay, Opacity is 100%, Styleis Linear, and the Angle is 45º. The colors I used are: Yellow(#00085), Cyan (#1bdaeb), Purple (#9b3b81), Orange (#d27e34).
第5步
隱藏橢圓圖層,打開背景層。在進行噴繪這前,我們來創建一個新圖層,隨便填個色彩。接著使用圖層效果的漸變疊加,漸變的設置如下:漸變混合模式是疊加,不透明度100%,樣式是線性,角度45,使用的顏色:黃(#00085),青(#1bdaeb),紫(#9b3b81), 橙(#d27e34)。
Step 6
Let'screate a new Folder in our Layer Palette. Rename the folder to Bokehsand change the Blend Mode to Color Dodge. Then create a new layer,choose white for the color and select the Brush Tool (B). Now justpaint some ellipses with our custom brush. For this first layer use abig size, like 500-600px.
第6步
讓~我們~在漸變圖層底下新建一個圖層組,取名是“Bokehs”,更改混合樣式為“顏色減淡”。再在圖層組里面建新圖層,設置前景色為白色,選畫筆工具,大小可以設置在500-600像素,然后可以開始噴繪。
Step 7
Go to Filter Blur Gaussian Blur. For this first layer use 20 pixels for the Radius.
第7步
選擇濾鏡-模糊-高斯模糊,半徑是20像素。
Step 8
Create another layer and paint more brushes. This timehowever use a smaller size for the brush. After that go toFilter Blur Gaussian Blur. Use 4 pixels for the Radius.
第8步
在圖層組里再新建另一個圖層,這次選個小點的筆頭,繼續噴啊噴~!。然后再加上高斯模糊,半徑是4像素。(不同的模糊度是為了得到景深遠近的效果)
, Step 9
Createanother layer and repeat the previous step, this time however use amuch smaller brush. Apply the Gaussian Blur to this layer as well, butuse only 1 pixel for the Radius.
第9步
再建個新圖層,重復上面的操作,這次筆頭設置更小。同樣加上高斯模糊,半徑1像素(可以適當調整畫筆間距和散布的數量)
Conclusion
Nowjust add your logo and that's it. We have a nice wallpaper. The idea ofthis tutorial was once again to show the power of the Brush Engine. Youcan try different shapes for this same effect, like hexagons forexample. Also you can play a bit with the blurs to add more depth tothe final design. Now it's up to you.
最后
再加上我們自己的logo,便完成了這個漂亮的壁紙啦。這個教程再次展示了畫筆引擎功能的強大。我們還可以使用其它筆頭形狀來實現這種效果,比如六邊形,當然我們還可以做出更多的模糊圖層以表現更多的景深效果。那么接下來就看你的了。~!
標簽壁紙,教程,泡泡,時尚,設計,photoshop

網友評論